
How to Make an Easy Origami Panda
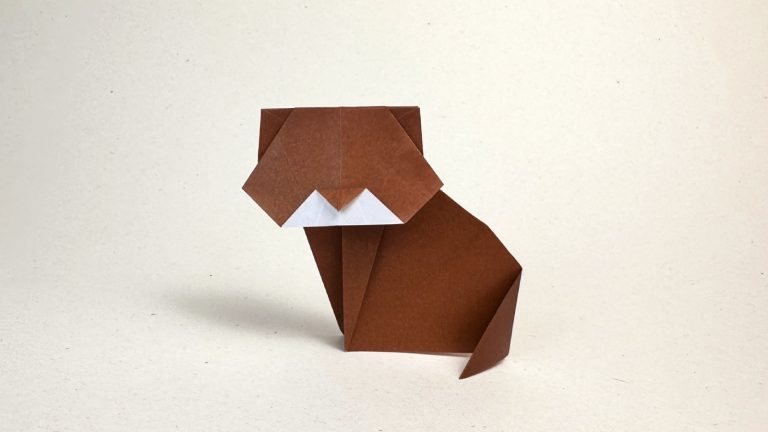
Here’s a model that’s guaranteed to make you smile. It’s a super charming origami panda designed by Adriano Mariani.
Adriano actually calls it “Kung Fu Panda,” and once you fold it, you understand why. With its wide stance, chubby belly, and little white paws peeking out, it looks like it’s ready to bust a move.
It’s also a great model for beginners: fun to fold, with no tricky steps, and the color change works beautifully to bring the panda to life.
Origami Panda Step-by-Step Instructions
- Difficulty: Easy – Beginner Level 3
- Folding time: 5-10 minutes
Recommended Paper
15×15 cm (6×6 in) black and white Kami
Step 1


Start with the colored side of the paper facing up in a diamond position. Fold the horizontal diagonal, then unfold.
Step 2


Fold the right corner over to meet the left corner. Fold only the top half of the vertical diagonal, then unfold.
Step 3


Fold both the left and right corners in to meet the center point.
Step 4


Turn the paper over.
Step 5

Fold the left and right edges inward to meet the centerline. Only fold the top layer. This will cause the bottom layer to shift and rest on top.
Step 6


Turn the paper over.
Step 7


Fold the bottom corner up to meet the center point.
Step 8


Fold the top corner down to the center point. Then, unfold it.
Step 9


Fold the top corner down along the dotted line. There is no reference point. However, the crease should be located before the bottom corners of the top triangle.
🐼 Folding tip: For Steps 9, 10, 11, and 13, try to keep your folds as horizontal as possible for a cleaner look. Use the center line as a reference.
Step 10

Fold and unfold the bottom corner of the flap you just created in Step 9. There’s no reference point, so refer to the diagram for placement.
Step 11

Fold the same corner up again, along the dotted line. Again, there’s no exact reference point.
Step 12

Fold the flap up along the dotted line. Again, there’s no exact reference point.
Step 13

Fold the top part of the model down along the crease made in Step 8.
Step 14

Slightly lift the bottom flap and pleat along the dotted lines. Use nearby corners and edges as reference points.
🐼 Folding tip: Try this step in two parts:
- First, fold the top part backward along the existing crease.
- Then, fold the top edge down to where the body and arms intersect.
👉 Note: The panda’s head flap should now sit on top of the belly flap.
Step 15

Fold the bottom corner of the right arm up to meet its top corner (in half), then unfold.
Step 16

Open the right arm flap and squash fold along the creases made in Step 15.
Step 17

Fold the top corners of the right arm down to meet the bottom corners.
Step 18

Open the pocket and press the center of the flap down.
Step 19

Repeat Steps 15 to 18 on the left arm.
Step 20

Mountain fold the ears toward the back of the model. Then, turn the model over.
Step 21

Fold the ear flaps up along the dotted lines. There are no precise reference points, but the ears should line up symmetrically.
🐼 Folding tip: Flip the model back over to check how the ears look. Adjust them until you’re happy with the shape.
Step 22

Mountain fold the top flaps of the arms along the dotted lines.
Step 23

Fold the tip of the head down, using the top edges of the ears as a guide.
Step 24


Turn the model over.
Step 25

Fold the tips of the ears, arms, and legs behind the model to round them out a bit.
Step 26

Gently pull the panda’s snout down.
Your Kung Fu Panda is ready for action! 🐼🥋


It’s a simple and satisfying model, and thanks to Adriano’s clever design, it really pops with just one sheet of dual-colored paper.
I hope you had a good time folding it.
If you want to keep learning and folding with us, don’t forget to join our newsletter and subscribe to our YouTube channel. And if you feel like sharing your panda, we’d love to see it! Tag us on social media or drop a picture in the comments.

Download the Complete Origami Panda Printable PDF Instructions
This printable PDF is part of our Origami Friends membership on Patreon. As a member, you get access to these diagrams, our full library of 120+ printable PDFs, and member-only content.
Watch the Origami Panda Video Tutorial
Enjoyed this tutorial?
Subscribe to our YouTube channel for new inspiring origami videos every week!


So op Love it
You are amazing
I love this Website Because it is so easy and the explanations are very straightforward