Learn How to Make Origami: The Complete Beginner’s Guide
Origami is actually a very easy hobby to pick up, and it’s a lot of fun. All you need is paper, and you can use pretty much any paper you can find. This guide will show you the main folds, the basic bases that are used as the foundation for a huge number of different models, and then you’ll learn how to fold your first model, the traditional paper crane.
Start With the Basics: The Mountain and Valley Folds
These are the two basic folds in origami for beginners. Pretty much every fold is either a mountain fold, a valley fold, or a combination of the two.

With a Mountain Fold, the crease bends the paper down, and the crease resembles a mountain.

With a Valley Fold, the crease bends the paper up, and the crease resembles a valley.
Want more than diagrams? Nothing beats learning from a teacher. That’s why we created a free Beginner Course with Boice Wong, one of today’s most inspiring origami artists.
Common Origami Folds
Here are the most common folds with step-by-step instructions on how to make them. These folds might not look exactly the same as they do in these examples all the time when you’re folding other models. However, these examples should show you how they work so you can figure out what you’re supposed to do when you’re following diagrams.
Inside Reverse Fold
This is a very common fold in origami where the paper is folded inside of the model.

Step 1) Start with a square of paper, white side up, and fold it in half diagonally. This isn’t actually part of the Inside Reverse Fold, but it’ll give you a shape that you can use to make the Inside Reverse Fold on.

Step 2) Fold along the dotted line. This is where you’re going to make the inside reverse fold. Your fold doesn’t have to match the exact position of the line, so don’t worry if it doesn’t measure up exactly.

Step 3) Crease this fold well and then unfold it.

Step 4) Turn the paper over.

Step 5) Make a fold along the dotted line. This will be the opposite side of the fold you made earlier. Now you’re folding this the other way.

Step 6) Crease this fold well and then unfold it.

Step 7) Turn the paper over again so it’s back the way it was before.

Step 8) Push the paper inside the model following the two folds you made before.

Step 9) Push the paper all the way inside the model and flatten along the creases you already made.

The completed Inside Reverse Fold. The dotted line shows the path of the paper inside the model.
Outside Reverse Fold
The fold is the opposite of the Inside Reverse Fold. This time, the paper is folded outside of the model.

Step 1) Start with a square of paper, white side up, and fold it in half diagonally. This isn’t part of the Outside Reverse Fold, but it will give us a shape we can use to demonstrate the fold.

Step 2) Fold the paper along the dotted line. This will be where you will make the Outside Reverse Fold. Your fold doesn’t have to line up exactly where the line is, so don’t worry about making it completely perfect.

Step 3) Crease this fold well and then unfold it.

Step 4) Turn the paper over.

Step 5) Fold the paper along the dotted line. This will be the opposite side of the crease you made earlier.

Step 6) Crease this well and then unfold it.

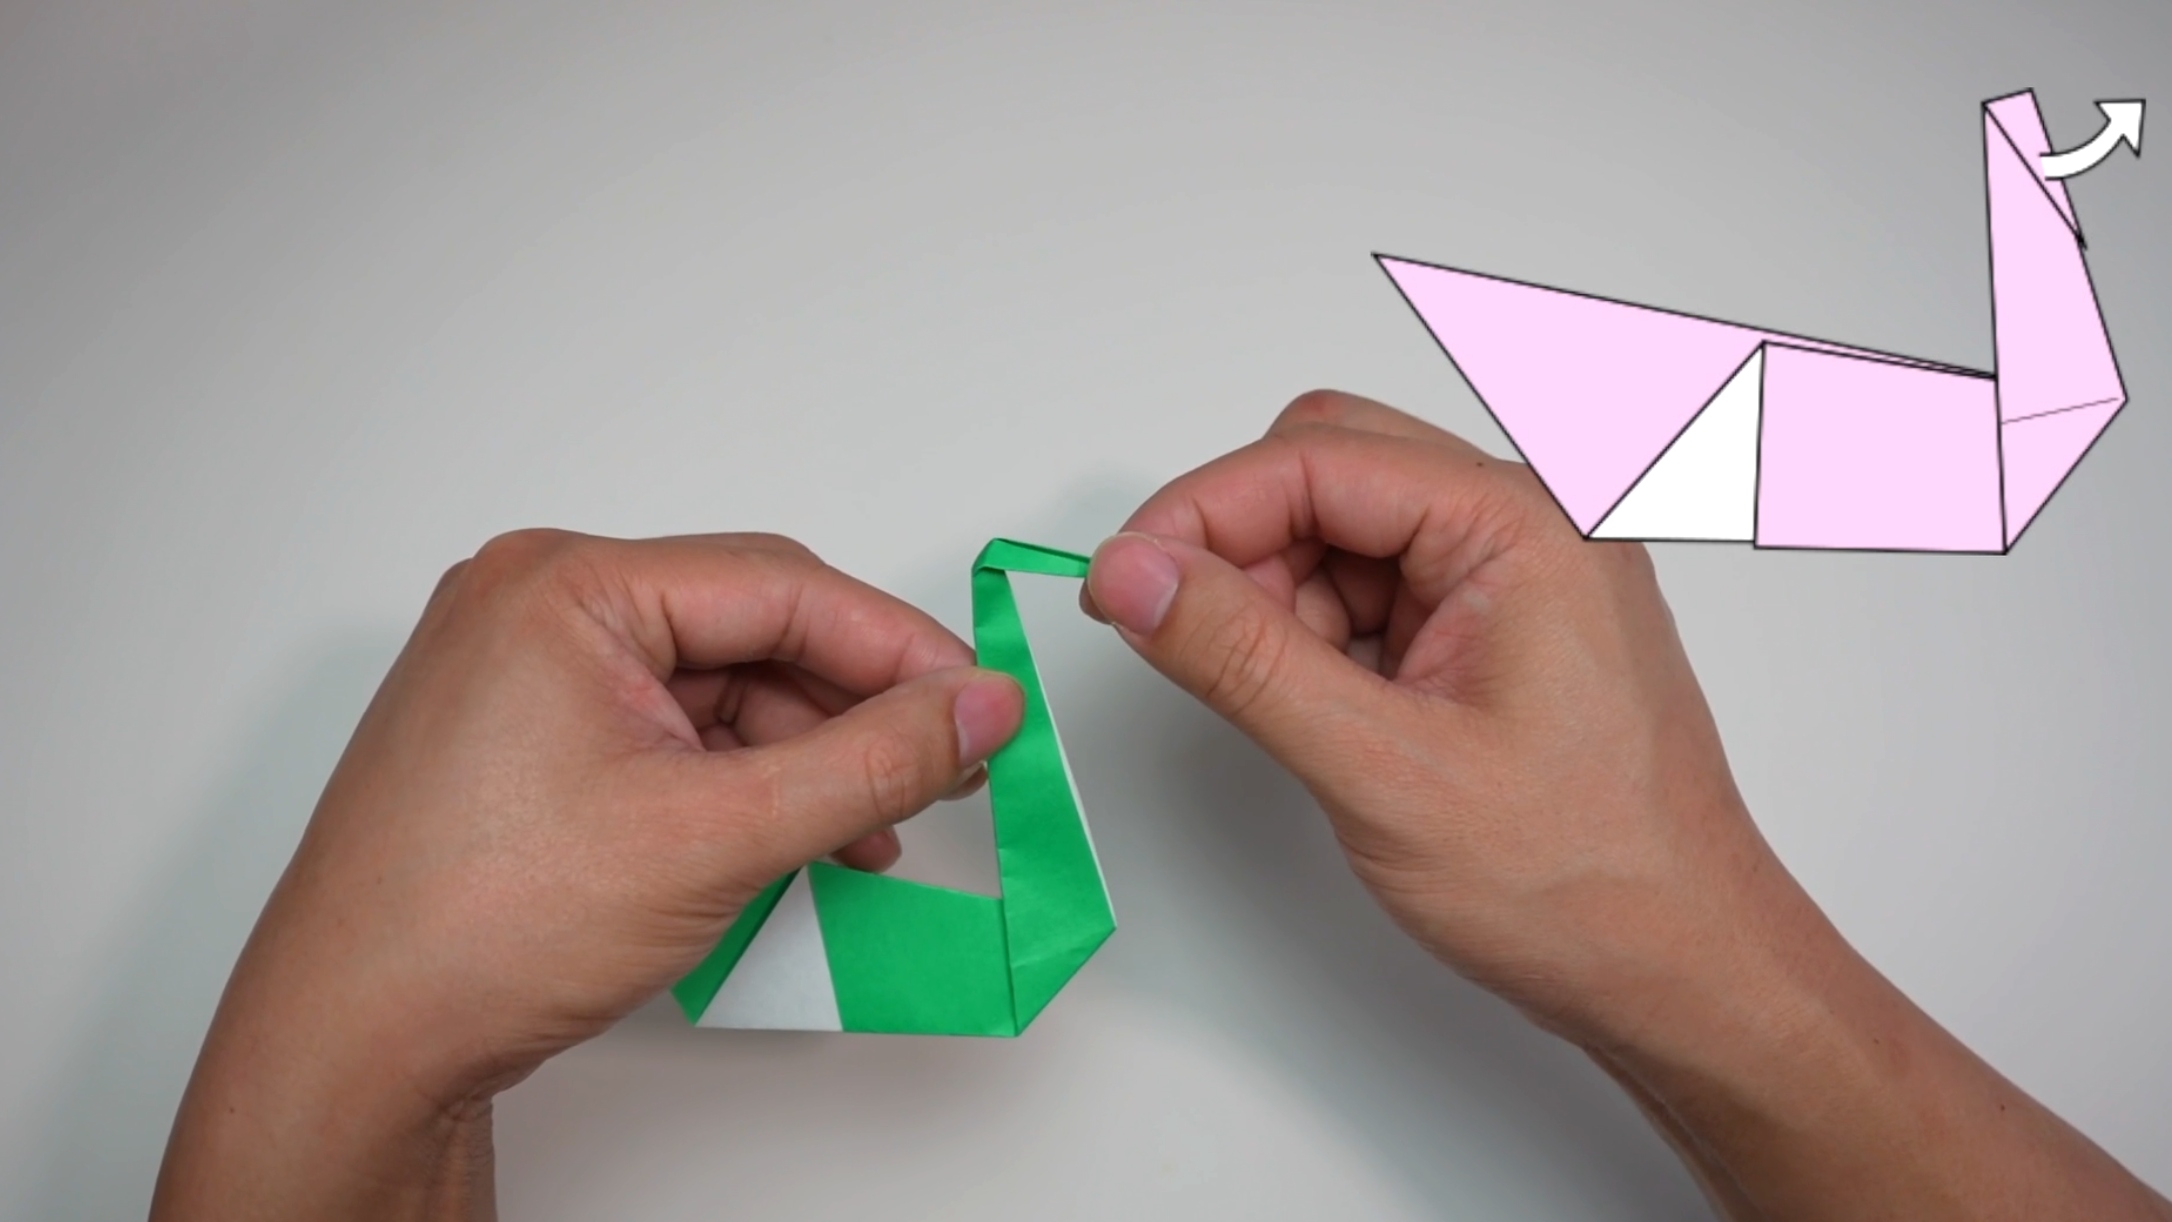
Step 7) Fold the paper outside the model along the creases you already made. To make it a bit easier, you can open the model up.

Step 8) Fold the paper down along the creases you already made.

Step 9) As you fold the paper down, close the model up again along the crease you made in step 1. The paper you folded down should flatten nicely on the outside of the model.

The completed Outside Reverse Fold. It’s the opposite of the Inside Reverse Fold. The shape of the fold is essentially the same. It’s just folded the other way and outside the model.
Squash Fold
With this fold, you essentially take a flap of paper and squash it flat.

Step 1) This example starts with a Preliminary Base. The instructions for this base are further in this guide. Squash folds can be performed on a variety of different shapes, not just this base.

Step 2) There are four flaps of paper on this base. Lift one of them up. You will make a squash fold on this flap.

Step 3) Push down on the crease so you completely flatten the flap. Make sure both sides are symmetrical.

The completed Squash Fold.
Rabbit Ear Fold

Step 1) Start with a square of paper with the white side up. Fold the paper in half along the dotted line and then unfold it. You will use this line as a guide in later steps.

Step 2) Fold the paper along the dotted line. It should line up with the crease you made in step 1.
This fold results in a flap of paper that resembles a rabbit’s ear, which is where the fold gets its name.

Step 5) Crease this well and unfold it.

Step 6) Fold both sides of the paper along the dotted lines back to the center, following the two creases you just made. The paper will bunch up in the middle, and you will make a new crease along that small vertical dotted line.

Step 3) Crease this well and unfold.

Step 4) Fold the paper on the other side along the dotted line. It should also line up with the crease you made in step 1.

Step 7) After step 6, you should have a triangle-shaped flap of paper. Fold this down to the side. In general, it doesn’t matter which side you fold this flap down to. Different models will have different instructions for which side to fold it to.

The completed Rabbit Ear Fold.
Pleat
This is a straightforward, basic fold.

Step 1) This example uses a rectangle-shaped sheet of paper, but you can easily make this fold with a square or any other shape. Fold the paper to the side along the dotted line.

Step 2) Fold the paper back the other way along the dotted line. Note that this new fold is slightly to the left of the first fold you made.

The Completed Pleat. If you look at the shape of the fold from the side, it kind of looks like a letter Z.
Crimp

Step 1) Start off with a square sheet of paper with the white side up. Fold the paper in half along the dotted line and then unfold it.

Step 2) Next, make a Pleat by folding the paper to the left along the dotted line. Your fold doesn’t have to match the one in the diagram exactly. It just needs to be roughly in the same place.
This is very much like a Pleat but made on the outside of the paper, almost like an Outside Reverse Fold.

Step 3) Fold the paper back to the right along the dotted line. Your fold doesn’t need to be exactly in the same place as the diagram. This is just practice. You now have a Pleat.

Step 4) Fold the paper in half again along the crease you made in step 1.

The completed Crimp. Notice how it’s kind of like a pleat made on the outside of both sides of the paper.
Petal Fold
This is a fairly common fold, and it’s part of the Bird Base.

Step 1) For this example, start off with a Square Base. The instructions for this base are later in this guide. This is the most common way to make a Petal Fold. Fold the top right flap of paper to the center along the dotted line.

Step 2) Crease this fold well and then unfold it.

Step 3) Fold the top left flap of paper to the center along the dotted line.

Step 4) Crease this fold well and then unfold it.

Step 5) Fold the top part of the model down along the dotted line. The end points of this line should line up with the tops of the lines from the two creases you just made.

Step 6) Crease this fold well and then unfold it.

Step 7) Open up the top flap of paper, folding it upwards along the horizontal crease you just made.

Step 8) As you lift the paper up, also fold in the sides along the two creases you made on each side.

Step 9) Lift the paper all the way up and flatten everything along the three creases you already made. If you made the creases well, everything should fall into place easily.

The completed Petal Fold.
Petal Fold Variation
This is a slightly less common variation of the Petal Fold. It’s used in the Frog Base.

Step 1) Start off with a Square Base that has one of the four flaps Squash Folded. This is the exact shape that you’ll usually see this Petal Fold Variation made on. Fold the top right flap to the center along the dotted line.

Step 2) Crease this fold well and then unfold it.

Step 3) Fold the top left flap to the center along the dotted line.

Step 4) Crease this well and then unfold it.

Step 5) Lift the top flap of paper up along the dotted horizontal line, opening it up. There is no pre-existing crease along this line, so you’ll have to make it yourself as you fold the flap up.

Step 6) As you fold up the flap of paper, also fold in the sides along the creases you already made on each side and push everything flat.

The completed Petal Fold Variation.
Swivel Fold
The Swivel Fold comes up a lot in origami and is somewhat similar to the Petal Fold Variation.

Step 1) Start off with a Square Base that has one of the four flaps Squash Folded. You can make a swivel fold on many different shapes, but this one is easy to demonstrate. Fold the top left flap of paper to the center along the dotted line.

Step 2) Crease this fold well and unfold it.

Step 3) Lift up the top flap of paper, making a fold along the dotted line from the top of the previous fold to the corner of the top-colored section of paper. There isn’t a crease here already, so you’ll have to make this fold on your own as best you can.

Step 4) As you fold along that dotted line, the paper will automatically fold along the crease you already made on the left side. Push everything completely flat.

The completed Swivel Fold.
Open Sink
This is the most challenging fold in this guide. If you can’t fold it now, don’t worry. Keep practicing, and eventually, you’ll get it. You won’t see this fold in any beginner-level models anyway.

Step 1) For this example, start off with a Square Base. The instructions for this base are later in this guide. Fold the top part of the model down along the dotted line. This is just practice, so don’t worry about making your fold in exactly the same place as the diagram.

Step 2) Crease this fold very well and then unfold it.

Step 3) Turn the model over.

Step 4) Fold the top part of the model down along the dotted line. This will be along the crease you already made. Now, you’re folding it in the opposite direction.

Step 5) Crease this fold very well and then unfold it.

Step 6) The easiest way to make the Open Sink in this example is to open the paper up completely.

Step 7) Push the paper inside the model following the square of creases that you made.

Step 8) As you push the paper inside, start to close the model back up, folding along the creases that make the Square Base.

Step 9) Continue sinking the paper inside the model following the existing creases and continue to close the model back into the Square Base.

Step 10) Your paper should look something like this. Fold everything completely flat.

The completed Open Sink. The dotted line shows the path of the paper inside the model. Instead of sticking out like it was before, the triangle at the top is now sunk inside the model.
Origami Bases
There are several bases in origami that are used to start many different models. For example, the bird base is the start of many paper birds. Often, you’ll see instructions telling you to start with a particular base just to save some time or space in the instructions. There aren’t too many bases, and you’ll see the same ones repeated many times in different models.
Kite Base
This is the most simple base in origami, and it kind of looks like a kite, which is where the name comes from.

Step 1) Start with a square sheet of paper with the white side up. Fold it in half along the dotted line and unfold. You will use this line as a guide in later steps.

Step 2) Fold the right side of the paper along the dotted line to the center.

Step 3) Fold the left side of the paper along the dotted line to the center.

The completed Kite Base.
Square or Preliminary Base
This is probably the most common base in origami and is used in many different models. Sometimes, this base is called a Square Base, and sometimes it’s referred to as a Preliminary Base.

Step 1) Start with a square sheet of paper with the white side up. Fold it in half along the dotted line.

Step 2) Fold the paper in half again along the dotted line.

Step 3) Bring the top flap of paper up.

Step 4) Squash fold this flap of paper down. Make sure you keep both sides symmetrical. You should end up with a diamond shape.

Step 5) Turn the model over.

Step 6) Lift up the top left flap of paper to the middle.

Step 7) Squash fold this flap of paper down. Make sure you keep both sides symmetrical. You should end up with a diamond shape matching the one on the other side.

The completed Square or Preliminary Base.
Water Bomb Base
This base is used to fold the traditional origami Water Bomb and that’s where it gets its name. The base is used to fold lots of other things as well.

Step 1) Start with a square piece of paper with the colored side up. Fold it in half along the dotted line. Crease this well and then unfold.

Step 2) Fold the paper in half, the other way along the dotted line. Crease this fold well and then unfold it.

Step 3) Turn the paper over so the white side is now facing up.

Step 4) Fold the paper in half diagonally along the dotted line. Crease this fold well and then unfold it.

Step 5) Fold the paper in half diagonally the other way along the dotted line. Crease this fold well and then unfold it.

Step 6) Fold the paper together following the two diagonal creases and the horizontal crease that you already made.

Step 7) Push in the sides and fold the paper in half horizontally, following the creases you already made.

Step 8) The model should come together along the existing creases to make a shape that looks like this. Press everything flat along the existing creases.

The completed Water Bomb Base.
Bird Base
This base is used to fold a lot of different origami birds, including the paper crane, and that’s where it gets its name from. It’s a very common base and can also be used to fold all kinds of other origami.

Step 1) Start with a square sheet of paper with the white side up. Fold it in half along the dotted line.

Step 2) Fold the paper in half again along the dotted line.

Step 3) Bring the top flap of paper up.

Step 4) Squash fold this flap of paper down. Make sure you keep both sides symmetrical. You should end up with a diamond shape.

Step 5) Turn the model over.

Step 6) Lift up the top left flap of paper to the middle.

Step 7) Squash fold this flap of paper down. Make sure you keep both sides symmetrical. You should have a diamond shape matching the one on the other side. You now have a Square Base.

Step 8) Fold the top right flap of paper to the center along the dotted line.

Step 9) Crease this fold well and unfold it.

Step 10) Fold the top left flap of paper to the center along the dotted line.

Step 11) Crease this fold well and unfold it.

Step 12) Fold the top of the model down along the dotted horizontal line. The endpoints of this horizontal line will line up with the tops of the creases on either side.

Step 13) Crease this fold well and unfold it.

Step 14) Petal Fold the top flap of paper up along the dotted line. There is already a crease here from the previous step.

Step 15) Continue lifting up the top flap of the paper while folding in the sides along the existing creases.

Step 16) Push everything flat along the existing creases.

Step 17) The completed Petal Fold. Turn the model over.

Step 18) Fold the top right flap of paper to the center along the dotted line.

Step 19) Crease this fold well and unfold it.

Step 20) Fold the top left flap of paper to the center along the dotted line.

Step 21) Crease this fold well and unfold it.

Step 22) Fold the top of the model down along the dotted horizontal line. You already folded this on the opposite side of the model, so there will already be a crease here. Now, you will fold it the other way.

Step 23) Crease this fold well and unfold it.

Step 24) Petal Fold the top flap of paper up along the dotted line. There is already a crease here from the previous step.

Step 25) Continue lifting up the top flap of the paper while folding in the sides along the existing creases.

Step 26) Push everything flat along the existing creases.

The completed Bird Base.
Fish Base
This base is used to fold a traditional origami fish, which is where its name comes from.

Step 1) Start with a square sheet of paper with the white side up. Fold it in half along the dotted line and then unfold it. You will use this crease as a guideline in later steps.

Step 2) Fold the bottom right part of the paper to the center along the dotted line.

Step 3) Crease this fold well and then unfold it.

Step 4) Fold the top right part of the paper to the center along the dotted line.

Step 5) Crease this fold well and then unfold it.

Step 6) Make a Rabbit Ear Fold on the right side of the model following the existing creases.

Step 7) Fold the flap of paper to the bottom and fold everything flat.

Step 8) Fold the bottom left part of the paper to the center along the dotted line.

Step 9) Crease this fold well and then unfold it.

Step 10) Fold the top left part of the paper to the center along the dotted line.

Step 11) Crease this fold well and then unfold it.

Step 12) Make a Rabbit Ear Fold on the left side of the model following the existing creases.

Step 13) Fold the flap of paper to the bottom and fold everything flat.

The completed Fish Base.
Frog Base
This is the start of a traditional origami frog, which is where this base gets its name. This is probably the most complicated one of the traditional origami bases.

Step 1) Start with a square sheet of paper with the white side up. Fold it in half along the dotted line.

Step 2) Fold the paper in half again along the dotted line.

Step 3) Bring the top flap of paper up.

Step 4) Squash fold this flap of paper down. Make sure you keep both sides symmetrical. You should end up with a diamond shape.

Step 5) Turn the model over.

Step 6) Lift up the top left flap of paper to the middle.

Step 7) Squash fold this flap of paper down. Make sure you keep both sides symmetrical. You should end up with a diamond shape matching the one on the other side. You now have a Square Base.

Step 8) Bring the top left flap of paper up and towards the middle.

Step 9) Squash Fold this flap down.

Step 10) Push everything flat and make sure everything is squashed symmetrically.

Step 11) Fold the top right flap of paper over to the left.

Step 12) Bring the top right flap of paper up and towards the middle.

Step 13) Squash Fold this flap down.

Step 14) Push everything flat and make sure everything is squashed symmetrically.

Step 15) Turn the model over.

Step 16) Bring the top left flap of paper up and towards the middle.

Step 17) Squash Fold this flap down.

Step 18) Push everything flat and make sure everything is squashed symmetrically.

Step 19) Fold the top right flap over to the left.

Step 20) Bring the top right flap of paper up and towards the middle.

Step 21) Squash Fold this flap down.

Step 22) Push everything flat and make sure everything is squashed symmetrically.

Step 23) Take a moment to make sure your model looks like the diagram above. There should be 4 flaps of paper on each side.

Step 24) Fold the top right flap of paper to the middle along the dotted line.

Step 25) Crease this fold well and then unfold it.

Step 26) Fold the top left flap of paper to the middle along the dotted line.

Step 27) Crease this fold well and then unfold it.

Step 28) Fold a Petal Fold Variation along the horizontal dotted line and the creases you made earlier.

Step 29) Lift up along the dotted line in the previous step and fold everything flat along the existing creases.

Step 30) The completed Petal Fold Variation. You’re going to do this 3 more times.

Step 31) Fold the top left flap of paper along the dotted line in the center over to the right.

Step 32) Fold the new top left flap of paper along the dotted line in the center over the right.

Step 33) Fold the top right flap of paper to the center along the dotted line.

Step 34) Crease this fold well and then unfold it.

Step 35) Fold the top left flap of paper to the center along the dotted line.

Step 36) Crease this fold well and then unfold it.

Step 37) Fold a Petal Fold Variation along the horizontal dotted line and the creases you made earlier.

Step 38) Lift up along the dotted line in the previous step and fold everything flat along the existing creases.

Step 39) Turn the model over.

Step 40) Fold the top right flap of paper to the center along the dotted line.

Step 41) Crease this fold well and then unfold it.

Step 42) Fold the top left flap of paper to the center along the dotted line.

Step 43) Crease this fold well and then unfold it.

Step 44) Fold a Petal Fold Variation along the horizontal dotted line and the creases you made earlier.

Step 45) Lift up along the dotted line in the previous step and fold everything flat along the existing creases.

Step 46) Fold the top left flap of paper along the dotted line in the center over to the right.

Step 47) Fold the new top left flap of paper along the dotted line in the center over the right.

Step 48) Fold the top right flap of paper to the center along the dotted line.

Step 49) Crease this fold well and then unfold it.

Step 50) Fold the top left flap of paper to the center along the dotted line.

Step 51) Crease this fold well and then unfold it.

Step 52) Fold a Petal Fold Variation along the horizontal dotted line and the creases you made earlier.

Step 53) Lift up along the dotted line in the previous step and fold everything flat along the existing creases.

The Completed Frog Base. What you just did was take a Square Base, Squash Fold each of the 4 flaps, and then make a Petal Fold on each one. You can fold each of the flaps in any order you want, but if you follow these instructions exactly, everything should be perfect. Take a moment to check that you have the same number of flaps of paper on each side of the model.
Folding Your First Model, the Traditional Origami Crane
Once you’ve got the hang of all the above folds and bases, you’re more than ready to fold the traditional paper crane. The crane will start off with a bird base, and after that, most of the work is already done. This is probably the most famous model in origami and is the first thing I learned how to fold.
According to legend, if you fold a thousand of these, you get a ton of good luck, or you’re granted a wish.

Looking for Even More Origami Instructions?

We have an absolutely massive database of easy origami diagrams. If you’ve successfully understood all the techniques on this page, you should have no trouble folding anything that’s either Beginner or Easy level difficulty.
If you prefer video instructions, we also have an origami YouTube channel. Video instructions can be especially helpful as you can see exactly how the paper moves between each step.
Instructions for the best origami models can only be found in books. If you’re still looking for more awesome things to fold, check out our list of the best origami books. We’ve written reviews and made lists of the models you’ll find in each one. No matter what you’re looking for, you’ll definitely find some cool things to fold.