
How to Fold an Origami Manta Ray

 Nick Robinson
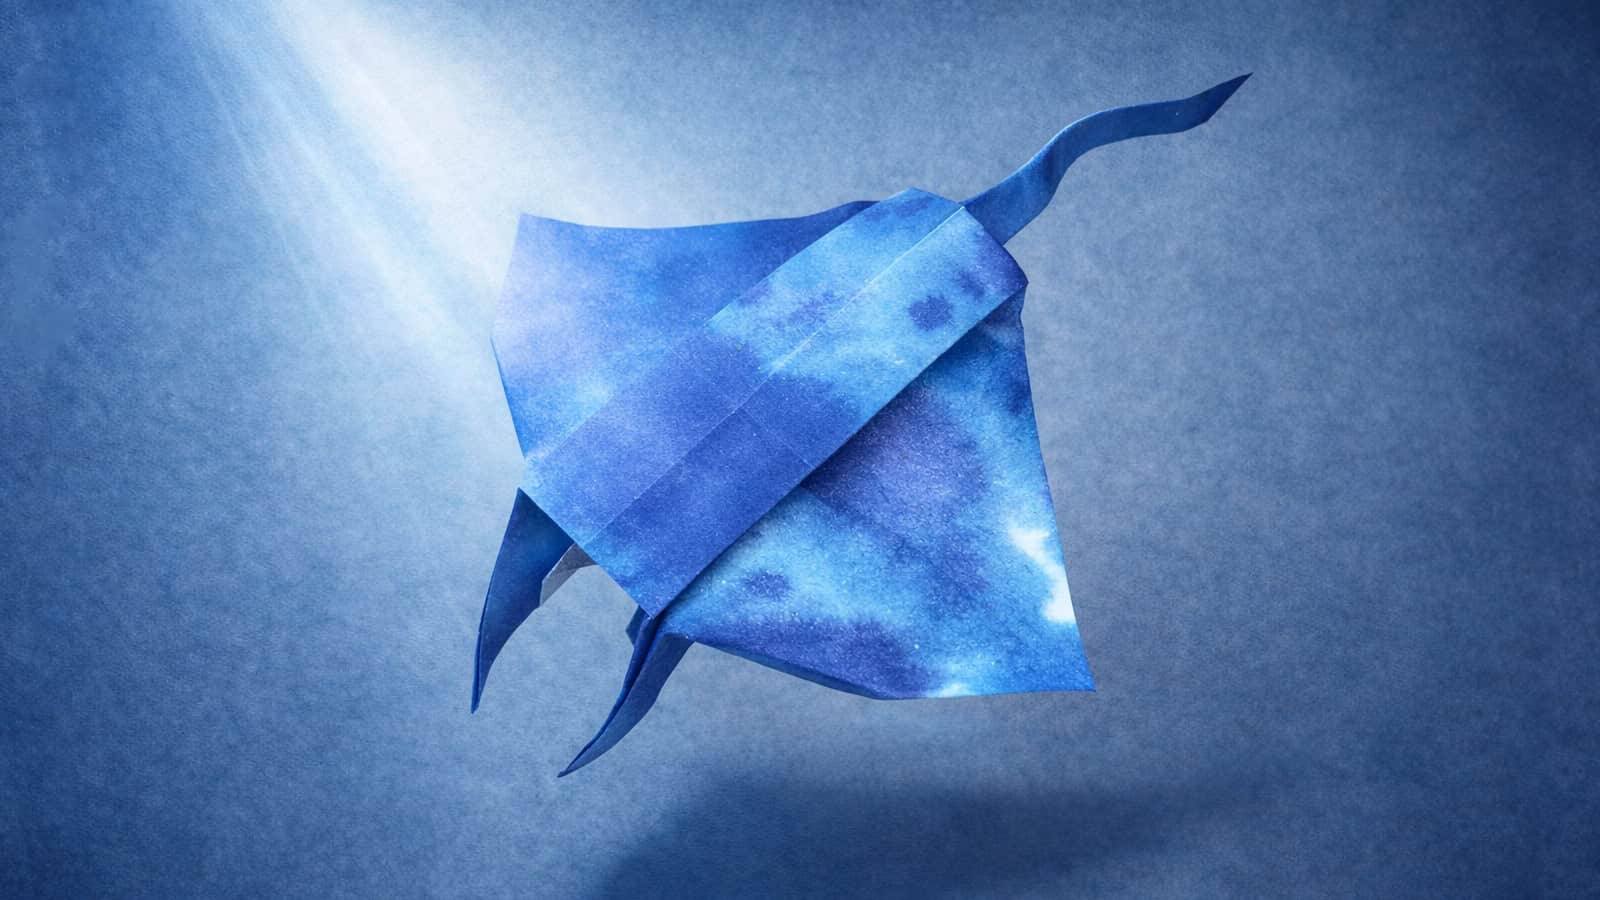
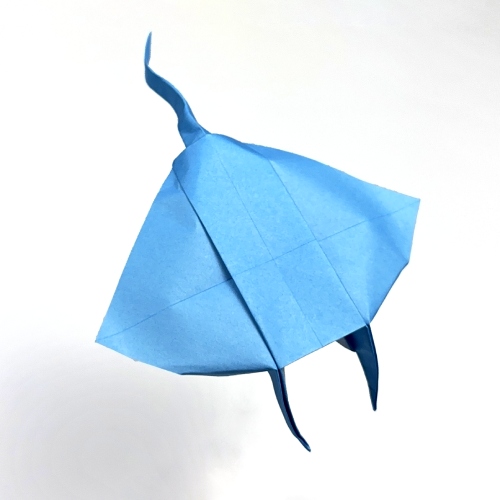
 This origami Manta Ray by Nick Robinson is one of those designs that feels really satisfying once it comes together. It’s not overly complex, but it still manages to look very fluid and lifelike. If you’ve got a bit of folding experience, you should be comfortable following along.
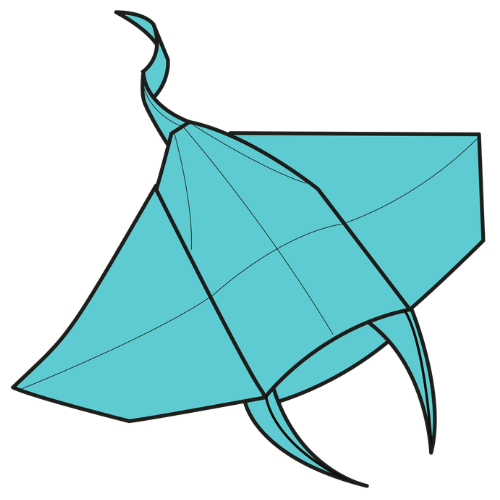
The shape is what makes it stand out. The wide, triangular wings spread out nicely, while the long, thin tail gives the model a strong sense of movement. There’s something very natural in the way it sits, like it’s gliding through water.
In the picture above, the paper choice adds a lot to the result. A soft gradient or textured paper works especially well here.
Origami Manta Ray Step-by-Step Instructions
- Difficulty: Low-Intermediate
- Folding time: 15 minutes
Recommended Paper
6 x 6 in (15 x 15 cm) origami paper (Kami) works well for the first fold. We used a 8 x 8 in (20 x 20 cm) Luminous Thai for the model in the featured picture.
Step 1
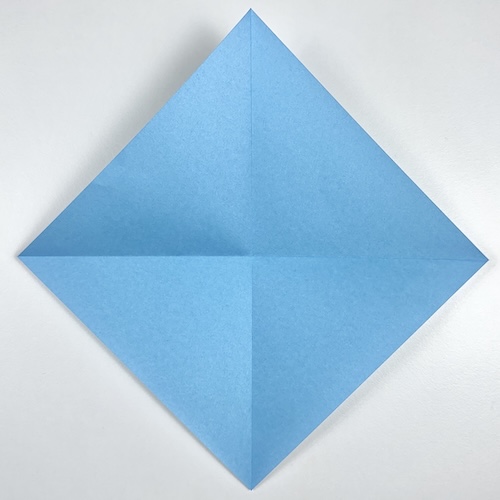
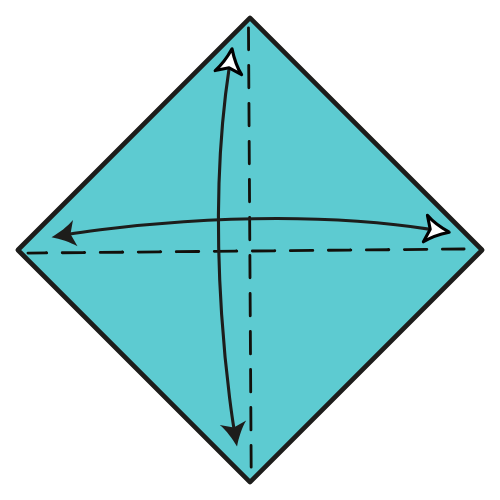
Start with the colored side facing up in a diamond position. Fold and unfold both diagonals.
Step 2
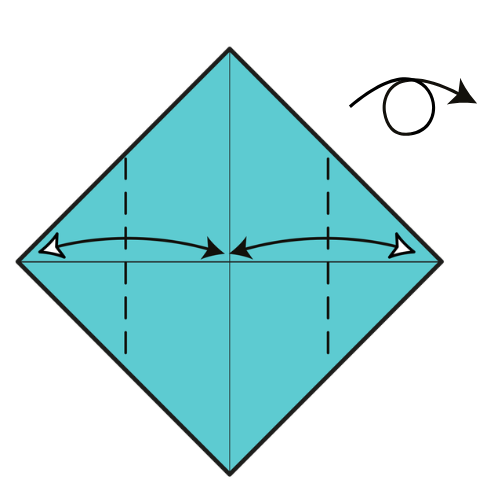
Fold and unfold the left and right corners to the center point. Then turn the paper over.
Step 3
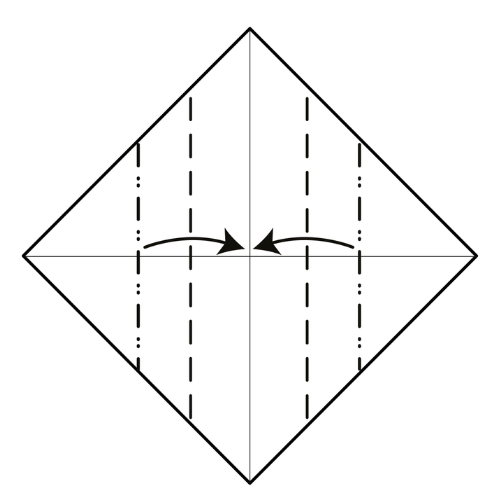
On each side, pinch the crease you just made and fold it to the vertical centerline.
Step 4
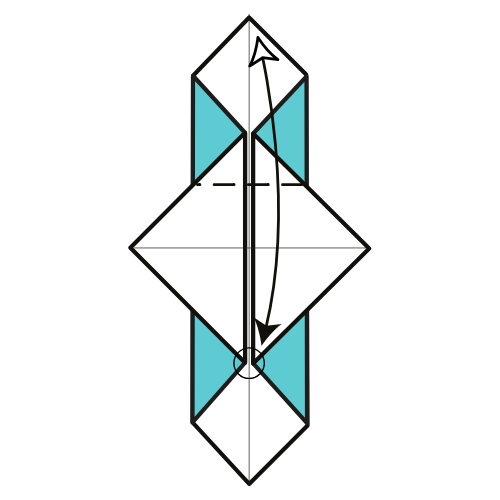
Fold the top corner down to the circled point. Then unfold.
Step 5
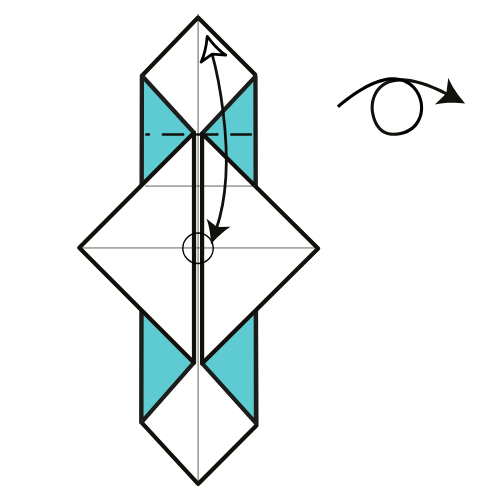
Again, fold the top corner down to the circled point. Then unfold and turn the paper over.
Step 6
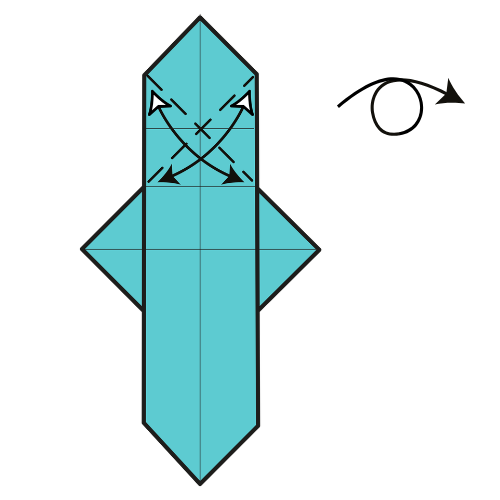
Fold and unfold the left and right edges to the horizontal centerline to create diagonal creases. Then turn the paper over.
Step 7
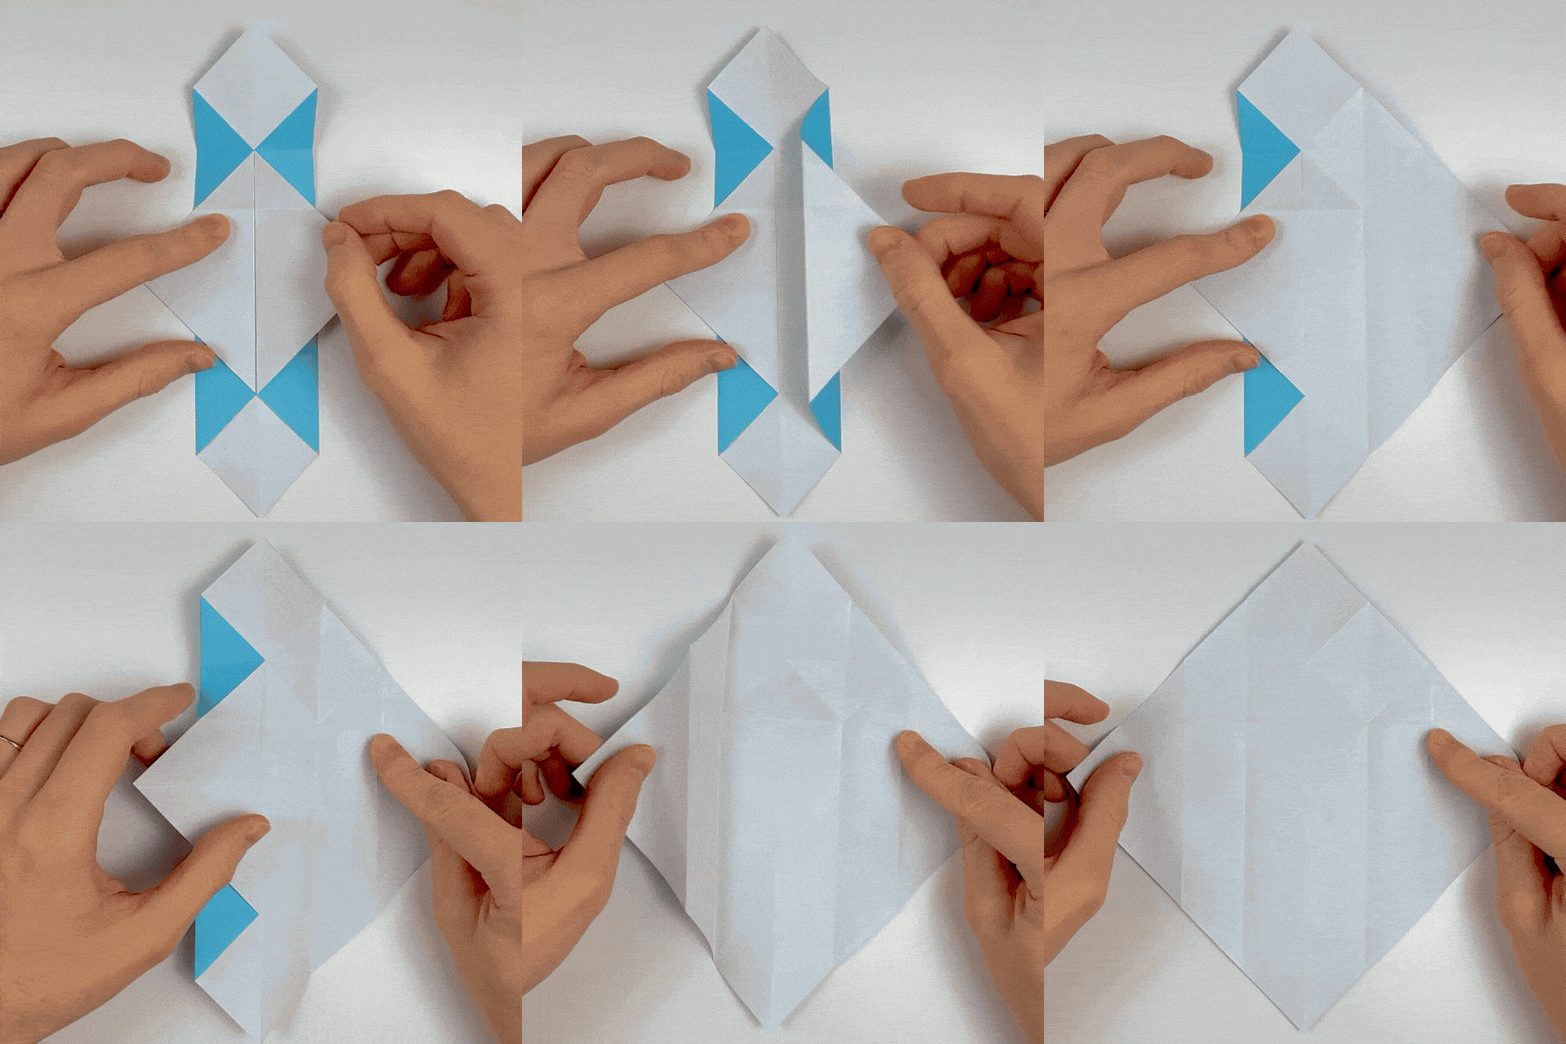

Unfold everything completely.
Step 8
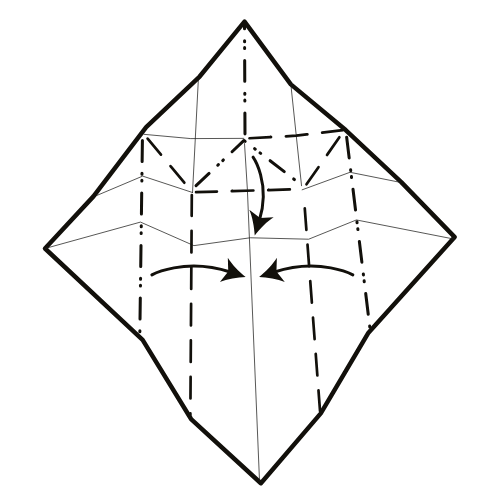
Collapse along the existing creases as shown. Start by folding the top area down, then fold the left and right sides inward.
🌊 Folding tip: Check the next diagram to see the correct collapsed shape.
Step 9
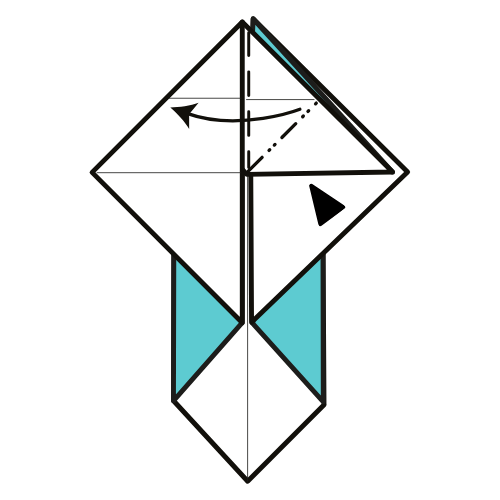
Lift up the top flap and squash it down along the existing creases.
Step 10
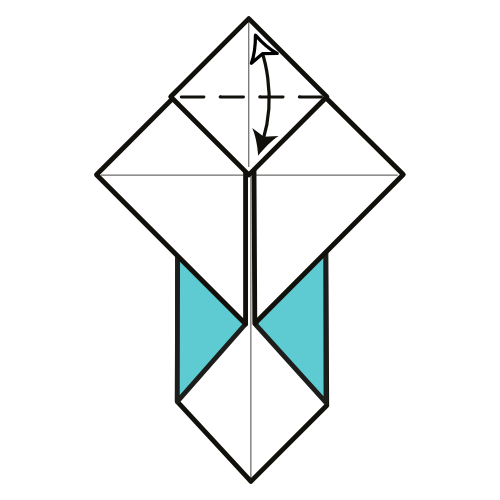
Fold the top square area in half along the horizontal diagonal. Then unfold.
Step 11

Mountain fold the top corner down into the back pocket along the crease you just made.
Step 12
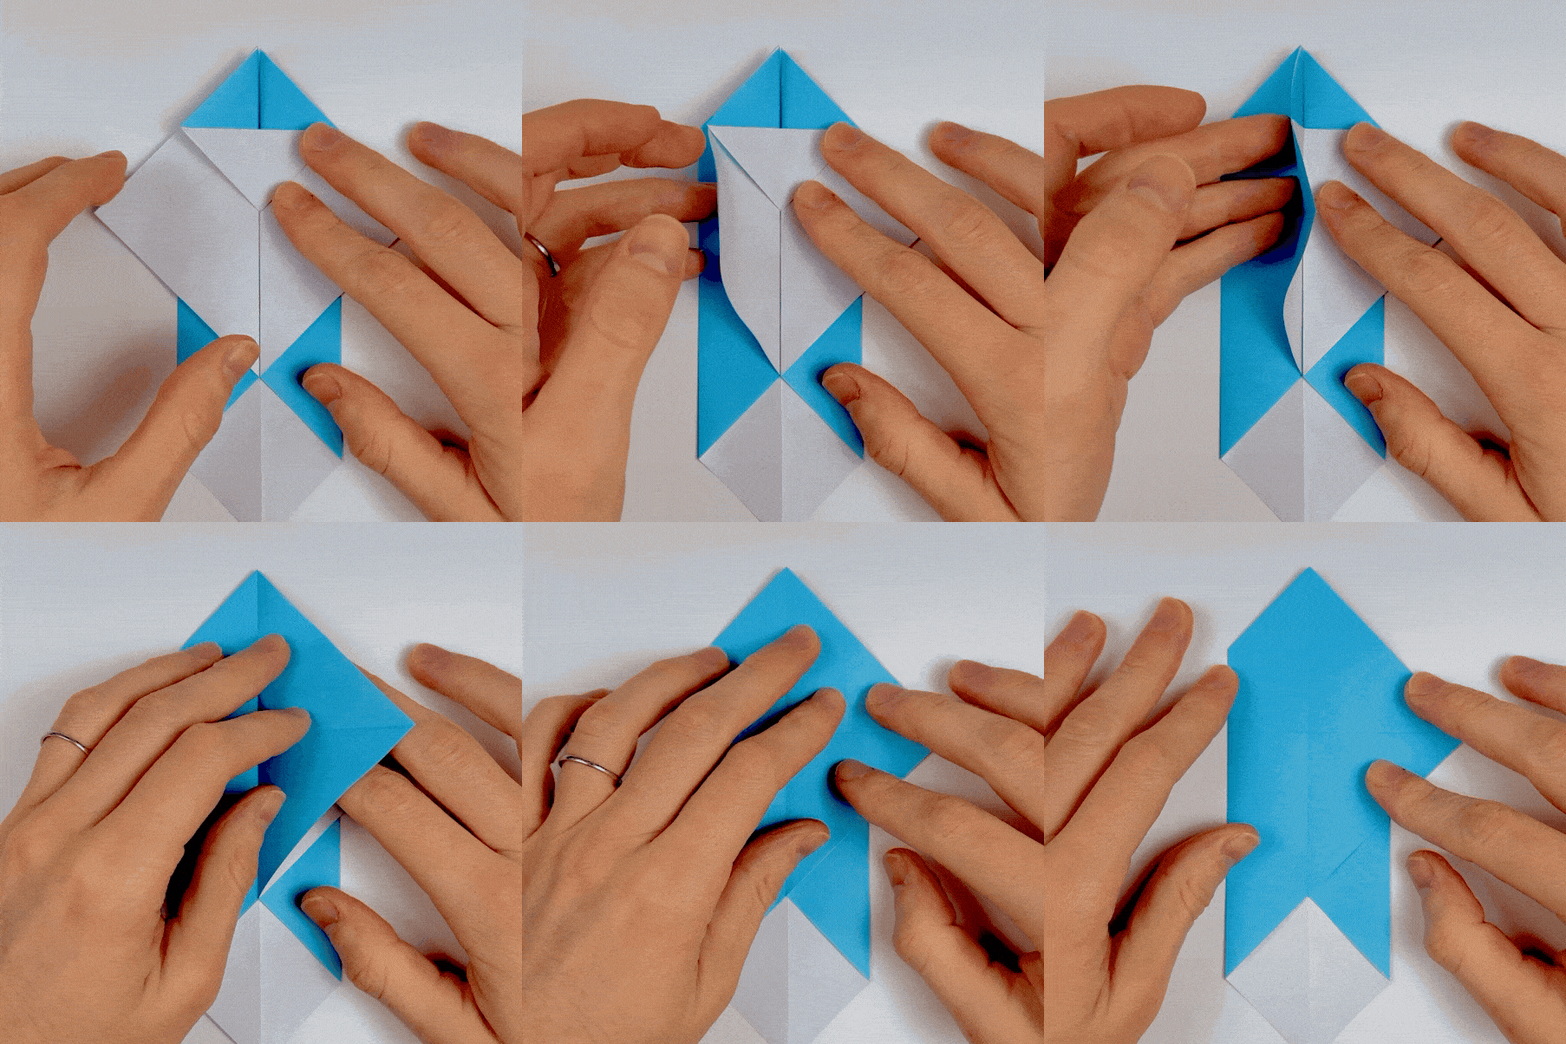
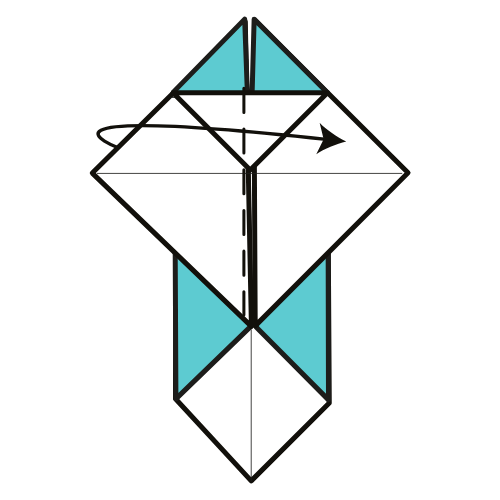
Fold the top left flap to the right.
Step 13
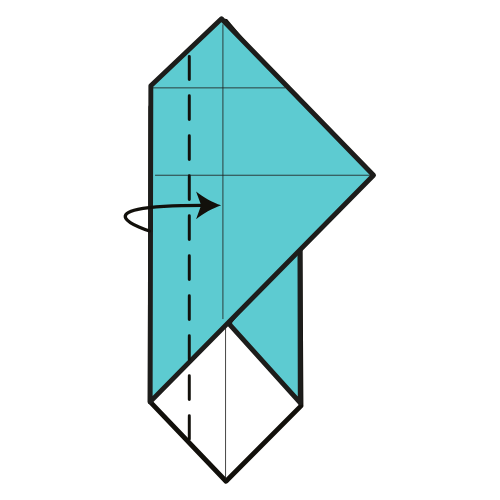
Fold the left edge toward the vertical centerline.
🌊 Folding tip: Don’t fold all the way to the centerline. Leave a thin gap so you can easily flip the top flap back later.
Step 14

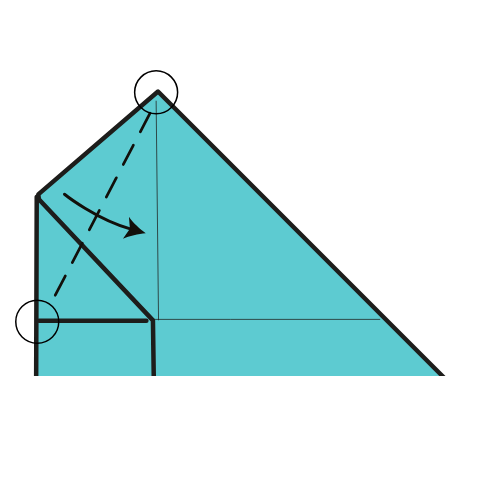
Fold the left corner inward. Your crease should connect the two circled points.
Step 15
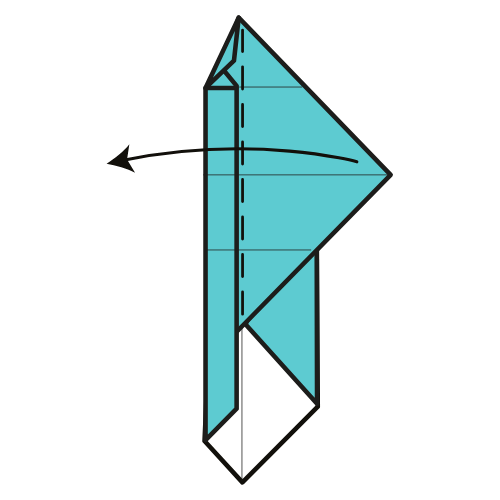
Fold the top flap back to the left.
Step 16
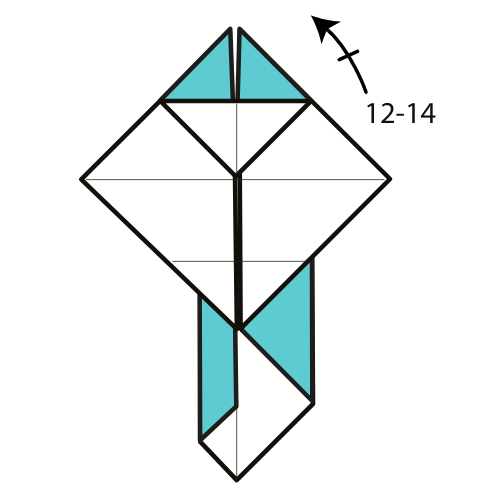
Repeat Steps 12 to 14 on the right side.
Step 17
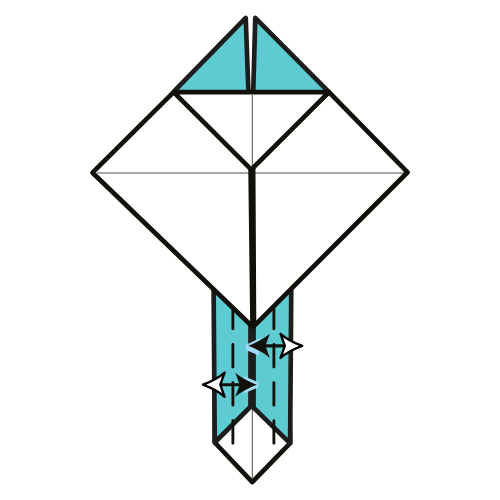
Fold and unfold the left and right edges of the tail fin to the centerline.
🌊 Folding tip: Slightly lift the top flaps to make this fold easier. Don’t crease the section located under the flaps.
Step 18
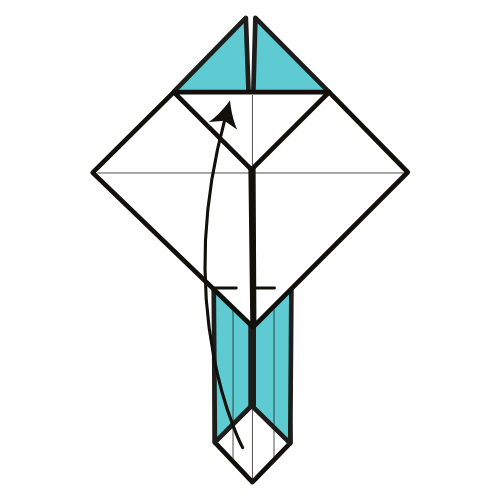
Fold the bottom corner up along the dashed line where the colored and white layers intersect.
Step 19
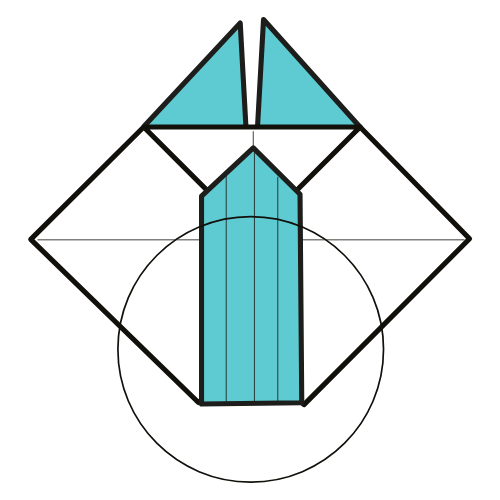
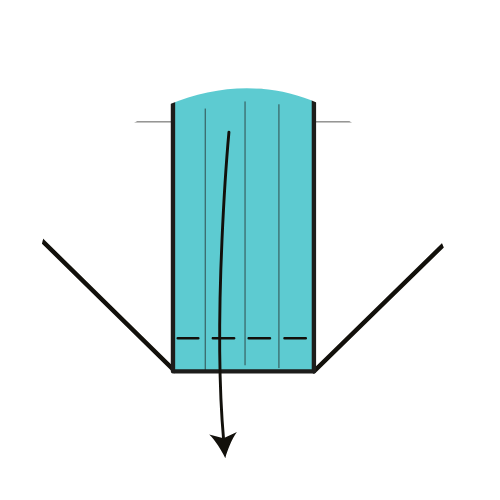
Fold the tail fin down along the dashed line.
🌊 Folding tip: Here, we are folding the white triangle at the back of the tail flap in half. Try to be as accurate as possible. Hold the model up to a light to see through the layers. Also check the back to make sure the creases line up.
Step 20
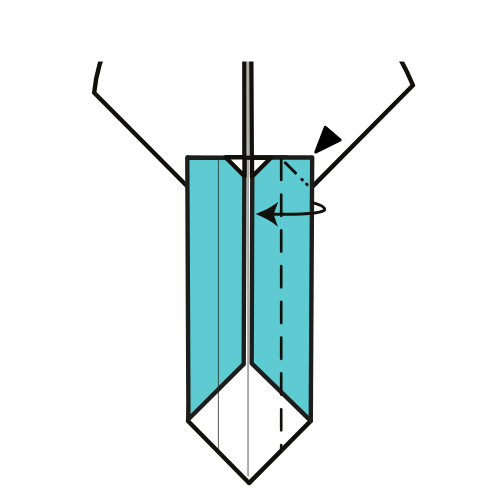
Fold the right edge to the vertical centerline. Squash the top area down to form a triangle.
Step 21
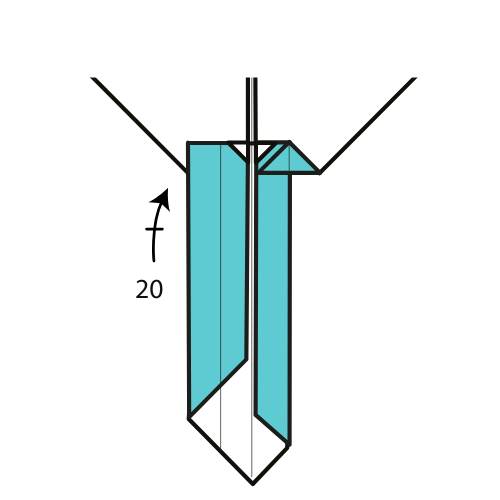
Repeat Step 20 on the left side.
🌊 Folding tip: Use a bone folder or pen to flatten all tail layers well so they lock into place.
Step 22

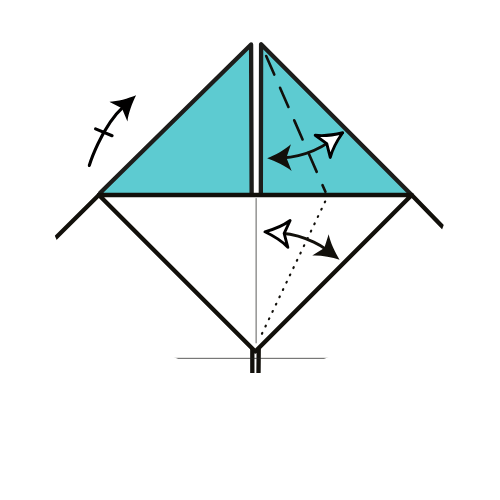
On each side, fold the top edge to the vertical centerline. Crease only from the top corner to the horizontal centerline. Then unfold. Repeat the same for the bottom edge.
🌊 Folding tip: For the bottom fold, crease only the bottom layer. Lift the top layer as you fold.
Step 23
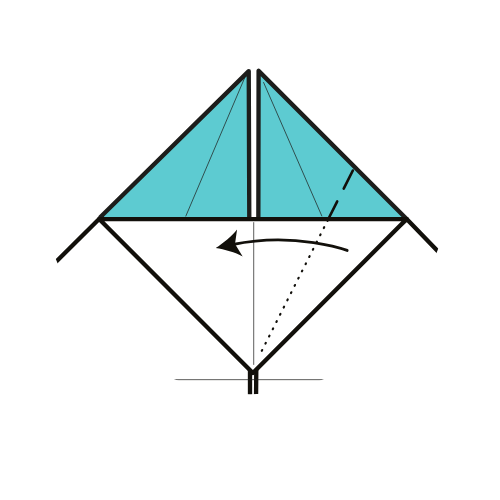
Fold along the crease you just made. Do not fold the top layer. From this step on, the model will not lie flat.
Step 24
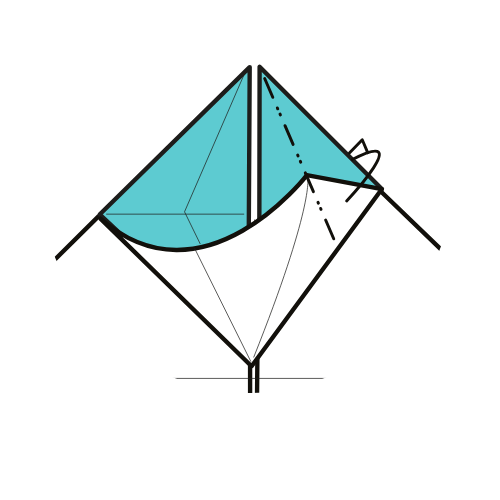
Mountain fold along the crease from Step 22, using only the two top layers.
Step 25
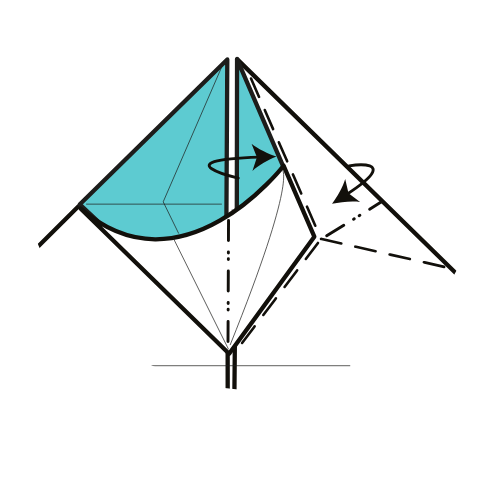
Thin the cephalic fin (the flap beside the mouth) as shown.
🌊 Folding tip: This step can feel tricky. First fold the right edge to the left along the nearest layers. Then move the cephalic fin to the right at about a 90 degree angle. Finally, round the wing (the pectoral fin) with a valley fold at about a 90 degree angle. You can also check the video if you get stuck 😉
Step 26
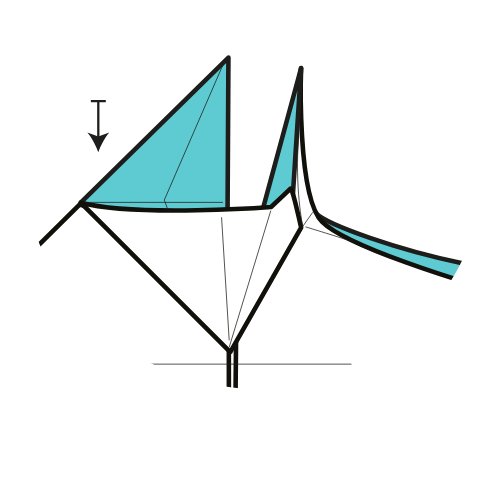
Repeat Step 25 on the left side.
Step 27
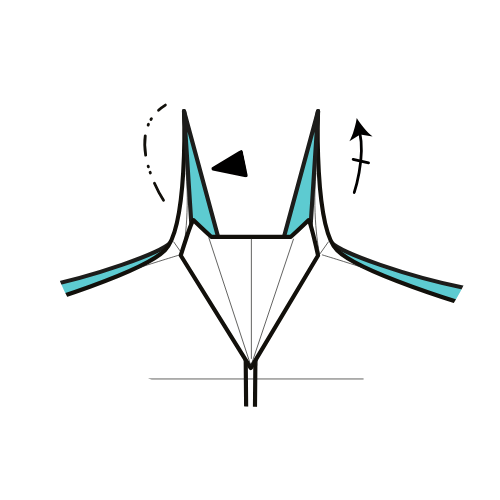
On both sides, gently curl the cephalic fins to shape them.
Step 28
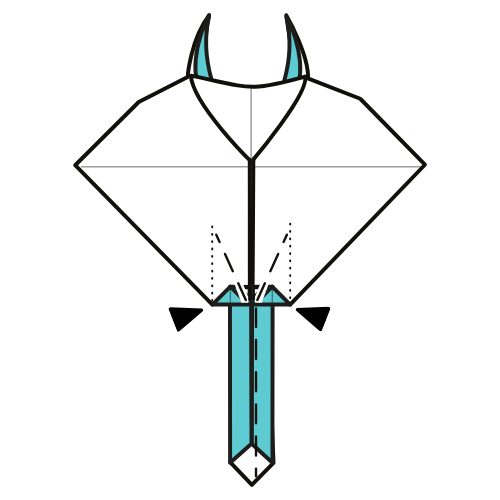
Thin the tail fin.
🌊 Folding tip: I like to do this from the top side view using mountain folds. First fold the tail fin in half. Then apply gentle mountain folds from the center point of the tail out toward the edges of the top strip.
Step 29
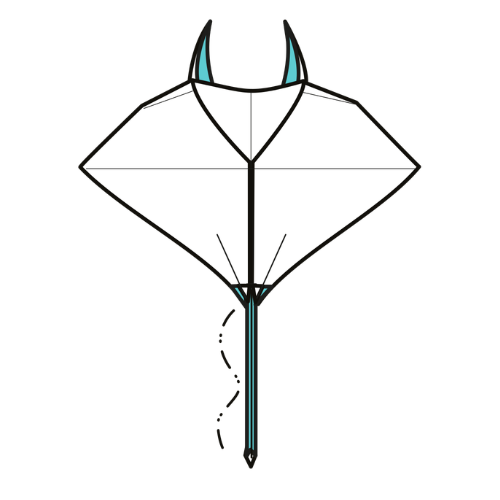
Curl the tail fin to finish shaping it.
Your Origami Manta Ray Is Ready to Glide!
I hope you enjoyed folding this manta ray. It’s a great example of how a relatively simple sequence can lead to something that feels really alive.
If you try it, feel free to share your version in the comments. I’d be curious to see what papers you choose, especially with patterns or gradients.
And if you haven’t yet, check out our origami YouTube channel for more step-by-step tutorials, or join our newsletter to get new models delivered straight to your inbox.
If you’re in the mood for more like this, you can also explore our easy origami collection or browse other origami animals to keep folding.
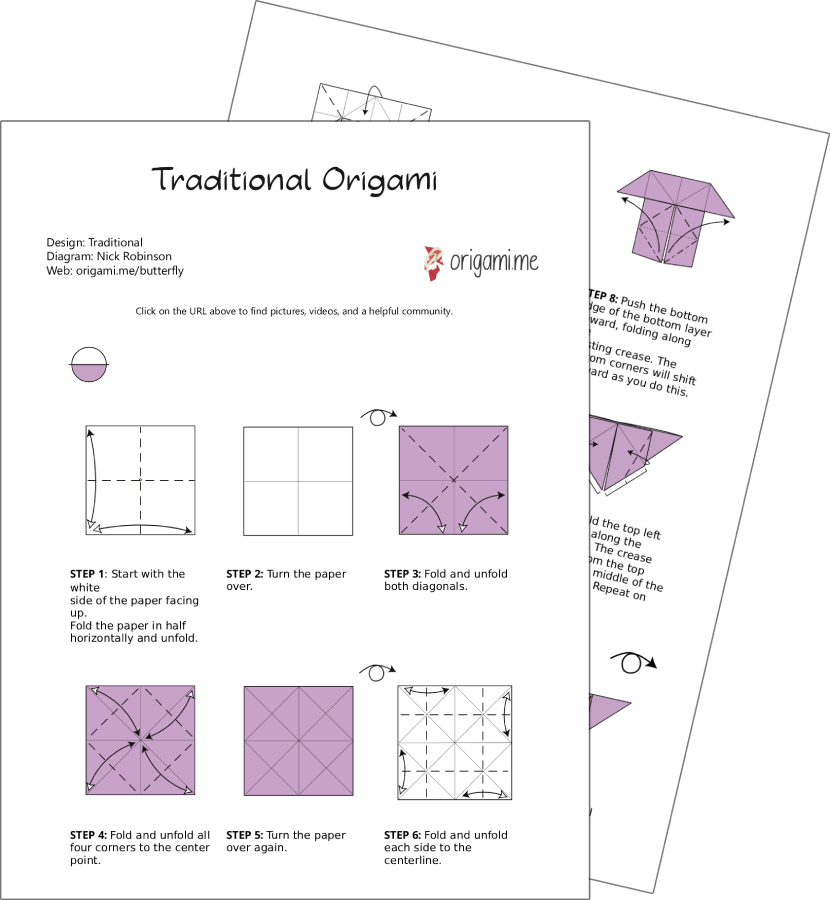
Download the Complete Origami Manta Ray Printable PDF Instructions
This printable PDF is part of our Origami Friends membership on Patreon. As a member, you get access to these diagrams, our full library of printable PDFs, and member-only content.
🎓 Need printables licensed for classroom or group use? See the Educator Library →




step 8 is literally impossible!!!!!!!!!!!!
You went from one of the easiest models on the site to one of the most difficult, so a bit of a struggle is expected 🙂 I’d try a few models in between first. You can filter all our tutorials by difficulty in the origami index.
Hello, thank you very much for showing this tutorial on how to make a ray. I’ll admit that without the videos, it would be harder for me to make so I appreciate you putting a lot of thought into making the tutorial. Now I’m curious to learn more about ray anatomy. 🙂
Hi Athena, nice fold! Thanks for sharing. I’m glad the tutorial was helpful 🙂 The more time you spend folding and shaping origami animals, the more you start noticing and learning about their anatomy.
Awesome! Thank you so much for your feedback.
a little hard, but fun! I’m always up to a challenge! thank you!
This is beautiful and is not that hard. Must try 🥰🥰
Amazing, Nyx! Thanks for sharing 🙂 Did you paint the paper?
Yes, I did 😅
The result is awesome!
this was quiet a challange
You did an amazing job 😊
And judging by your hands, you look pretty young too. You’ve got some real folding skills already!
How to do step 11
Hi Remsen, you need to tuck the top triangle in the pocket at the back. If you can watch the step video, I show what to do in it.