
How to Fold an Origami Dragon v2

 Sebastien Limet (Mister Paperfold)
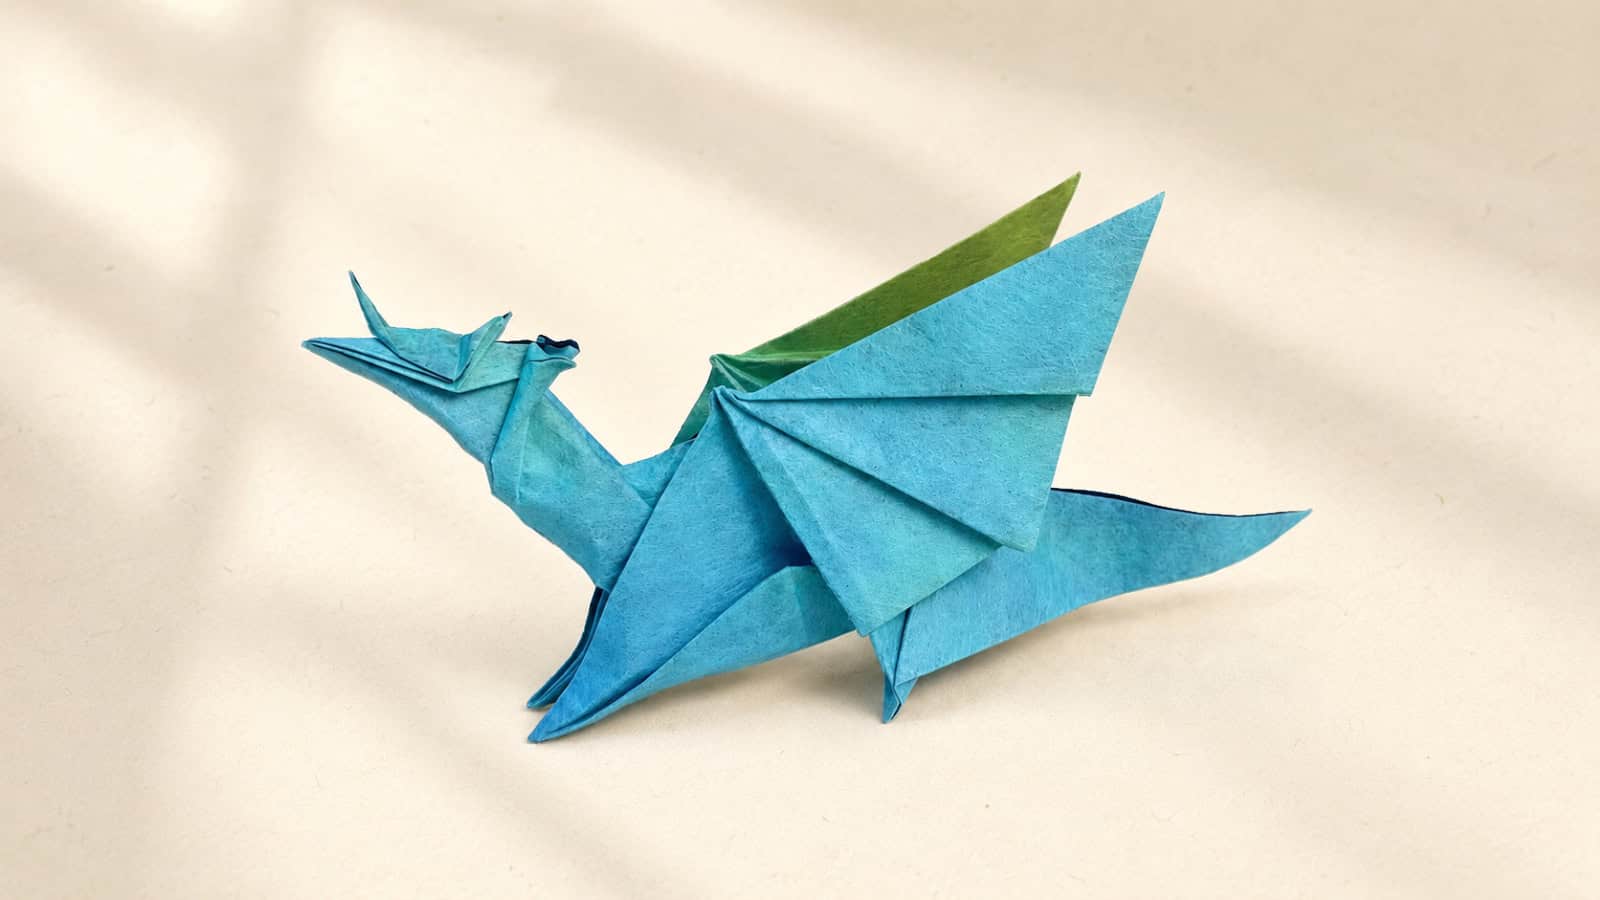
 Let’s learn how to fold an origami dragon designed by Mister Paperfold (Sébastien Limet), with help from Peter Buchan-Symons to develop the final folding sequence. If you’ve already folded our easy origami dragon, you’ll recognize the same starting base. This version builds on that foundation with more folds, more shaping, and a much more detailed final result.
The finished dragon has a long neck, a detailed head with horns, large pleated wings, and a sweeping tail. Side by side, the two models look like a baby dragon and an adult dragon.
This is a low-intermediate model and a great next step if you’ve already mastered beginner folds. While the dragon looks much more detailed than the easy version, it doesn’t rely on especially difficult techniques.
The diagrams were carefully developed to make the folding process as smooth as possible, making this a rewarding challenge for folders who are ready to take the next step. As the layers and details come together, the dragon gradually transforms from a simple base into a striking creature.
I hope you enjoyed folding this origami dragon. It takes a bit more time and patience than the easy version, but the final result is well worth the effort.
Origami Dragon Step-by-Step Instructions
- Difficulty: Low-Intermediate
- Folding time: about 30 minutes
Recommended Paper
9.5 x 9.5 in (24 x 24 cm) origami paper (Kami), Tant origami paper, or Shadow Thai
Step 1
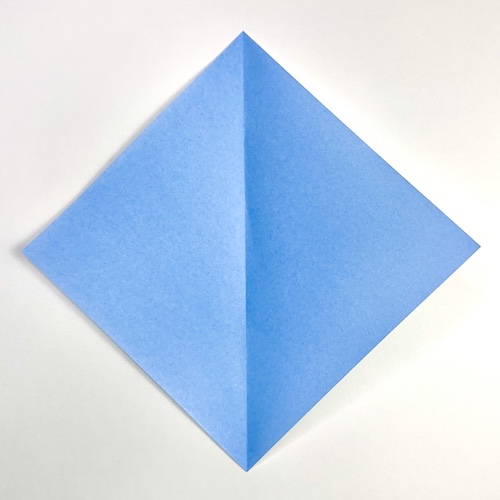
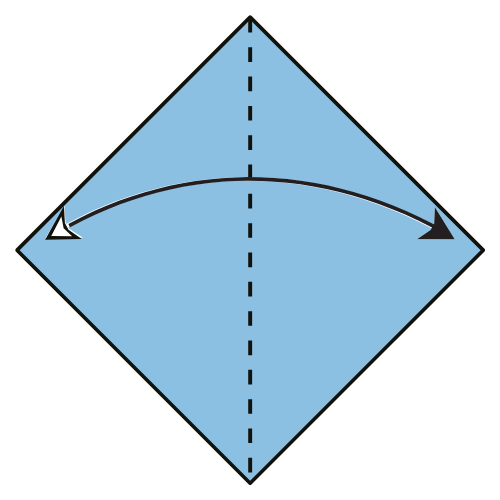
Start with the colored side of the paper facing up. Fold the paper in half vertically, then unfold.
Step 2
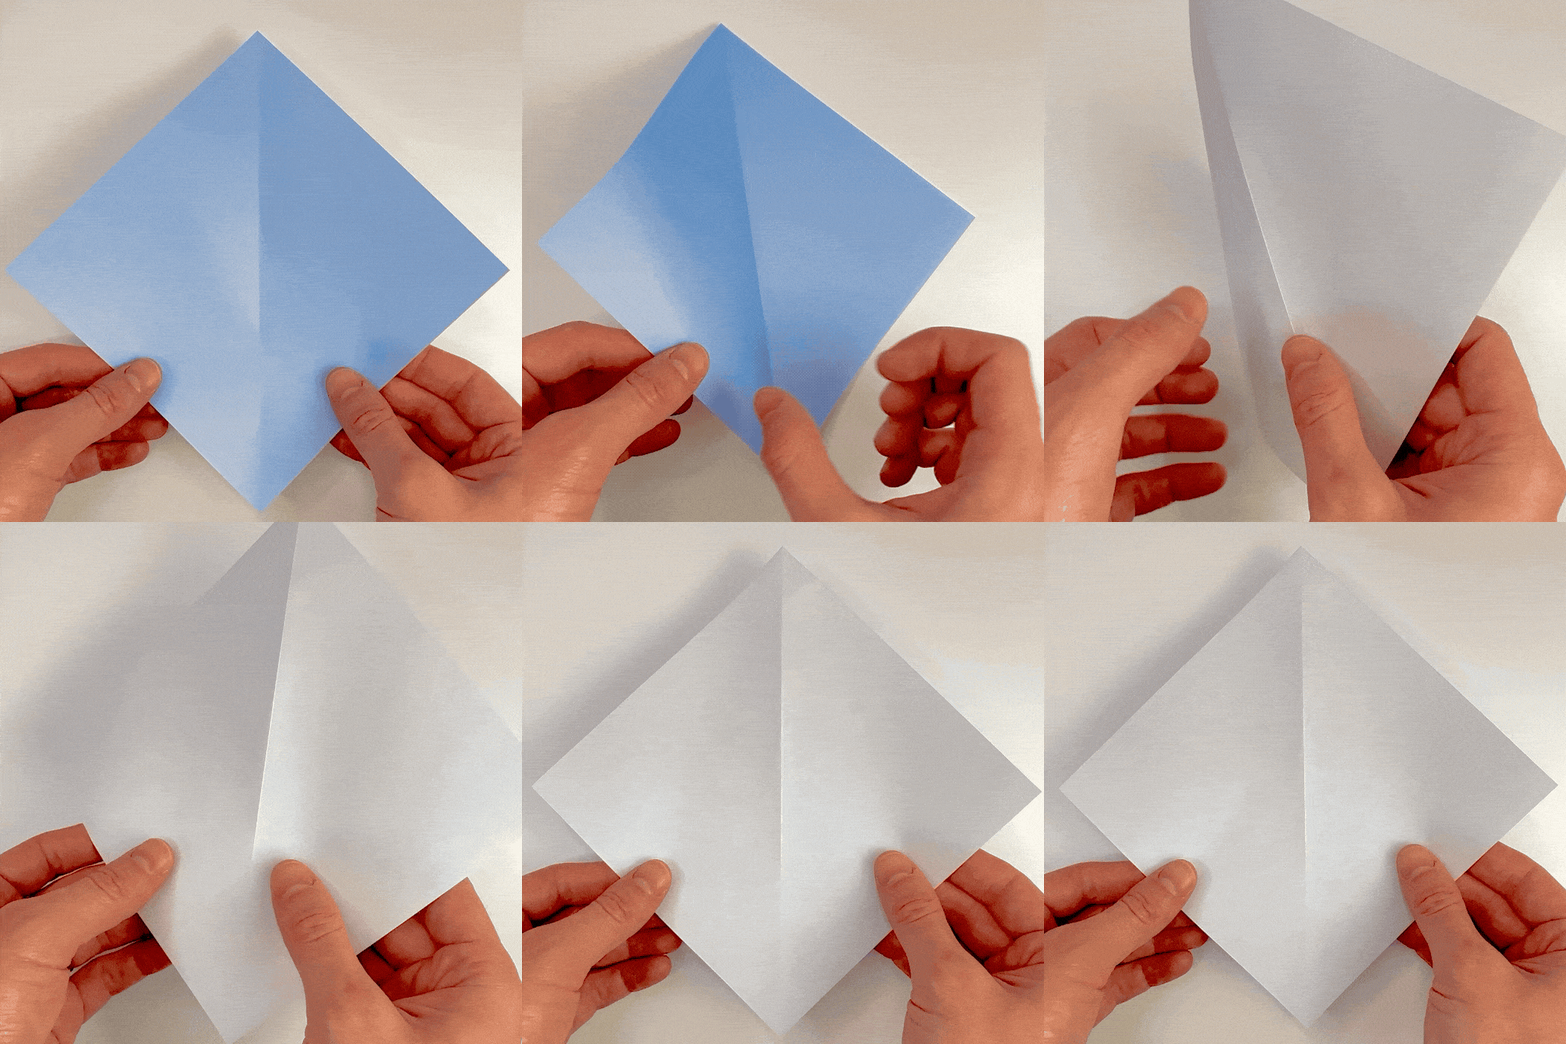
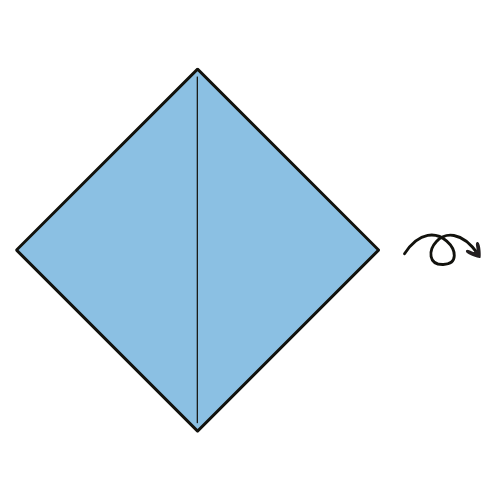
Turn the paper over.
Step 3
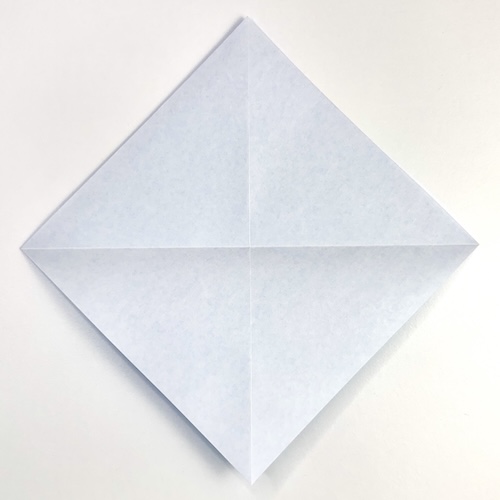
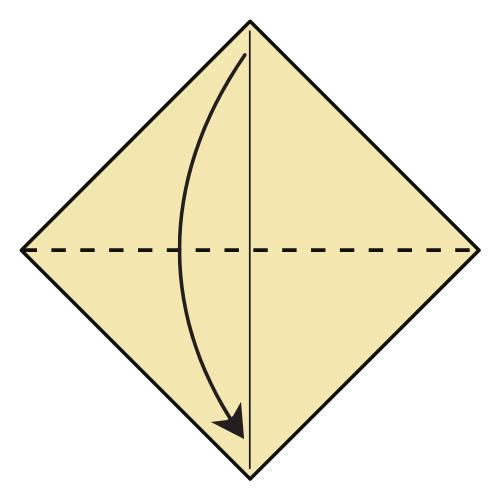
Fold the paper in half horizontally, from top to bottom.
Step 4
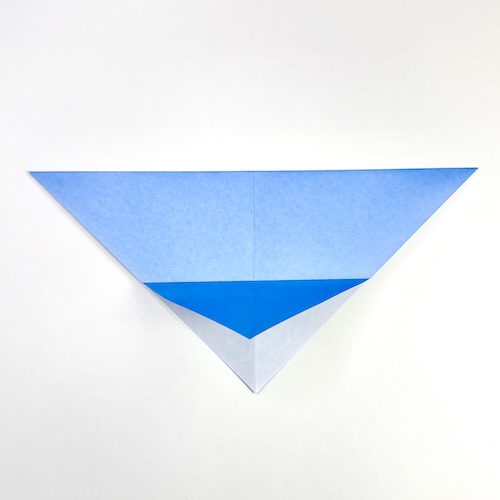
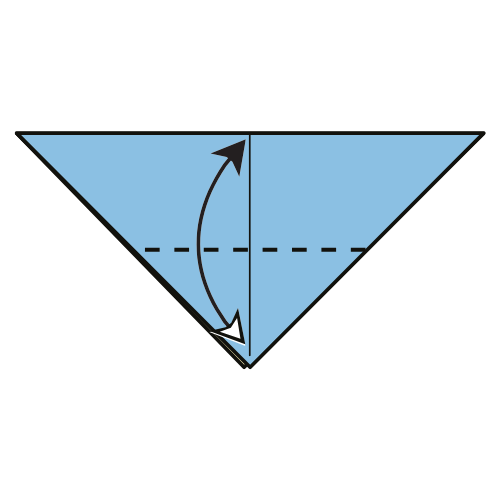
Fold the bottom corner up to the top edge using only the top layer. Then unfold.
Step 5
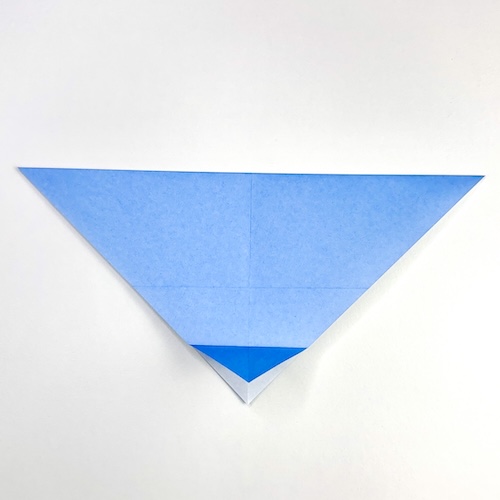
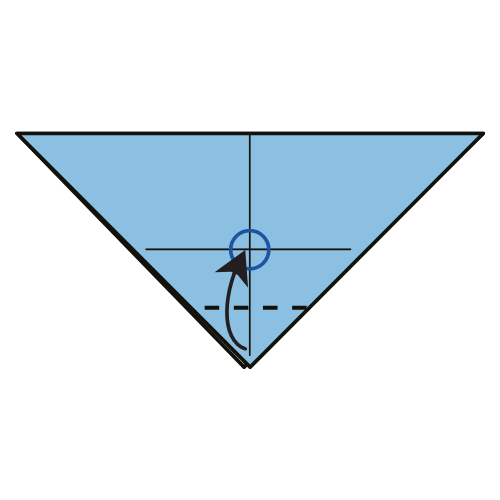
Fold the bottom corner up to the crease you made in Step 4.
Step 6
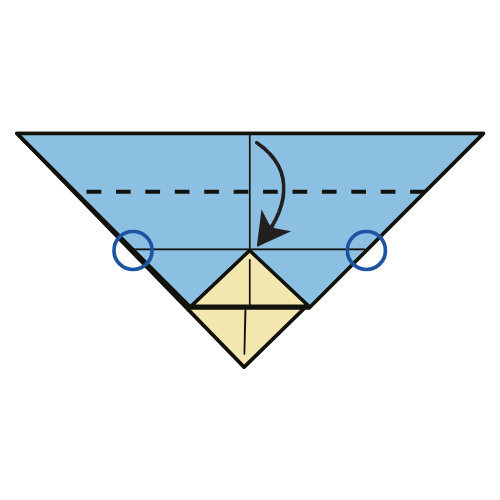
Fold the top edge down to the crease from Step 4.
Step 7
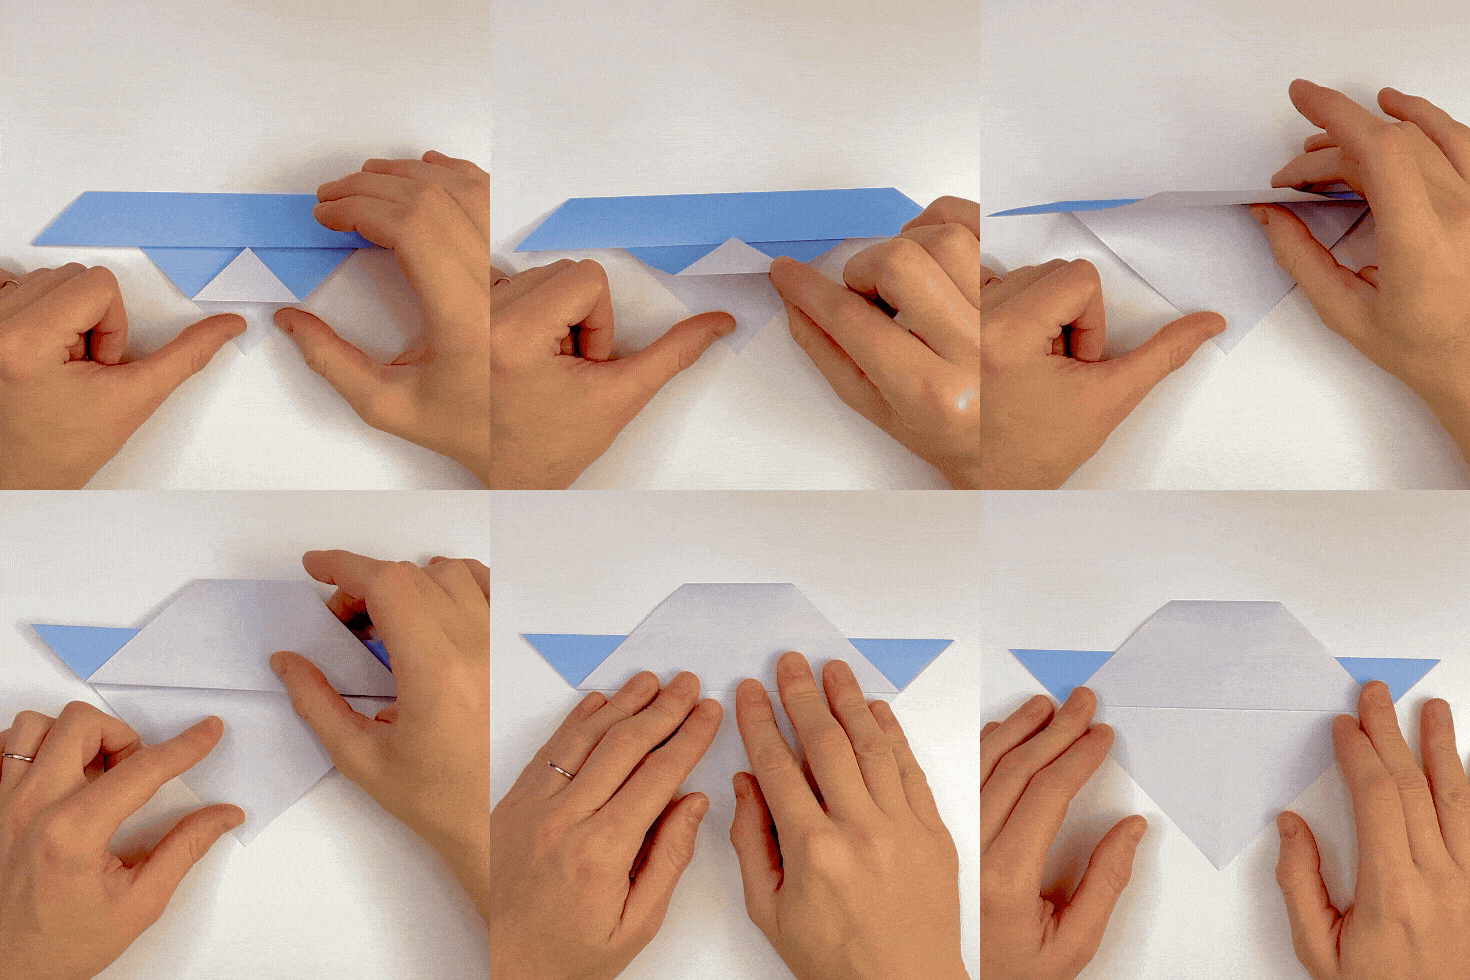
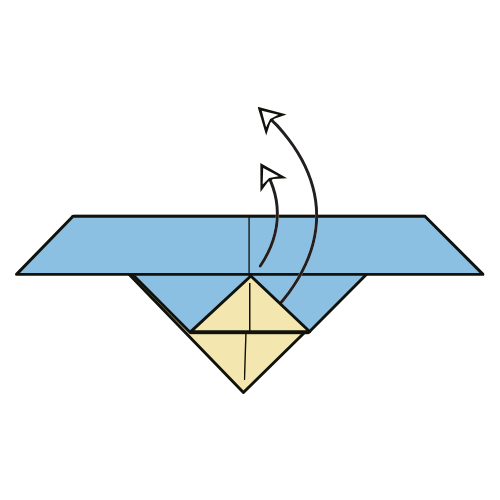
Unfold the top flaps upward.
Step 8
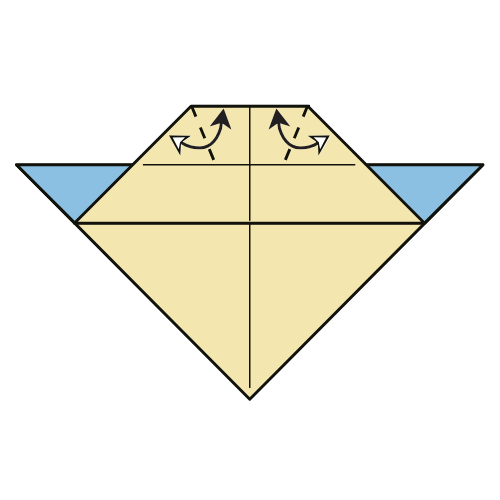
Fold and unfold the two angle bisectors shown.
Step 9
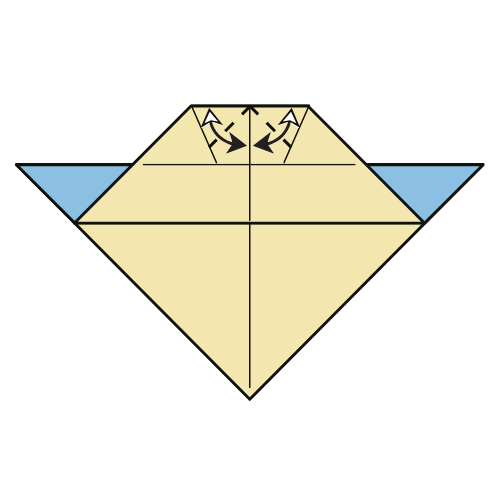
Again, fold and unfold the two angle bisectors shown.
Step 10
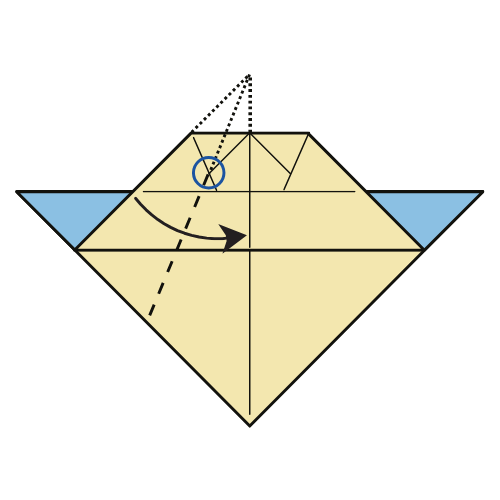
Fold the left edge to the vertical centerline, but only crease below the circled point.
Step 11
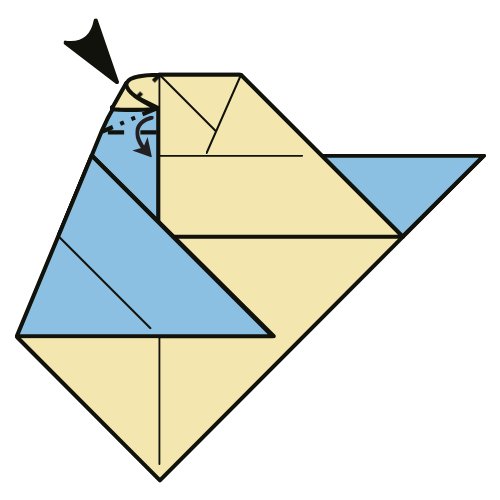
Swivel-fold the corner downward using a new horizontal valley fold.
Step 12
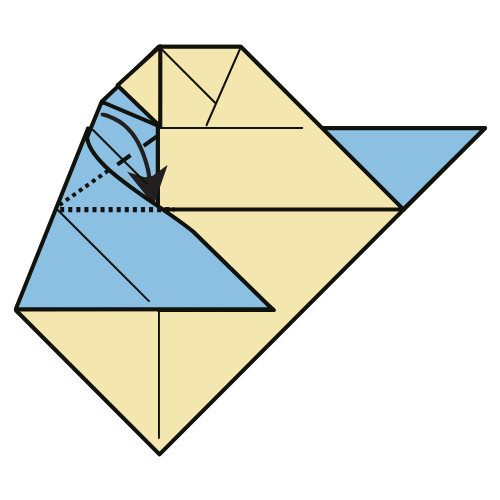
Lift the near flap, then fold the left edge so it becomes horizontal along an angle bisector.
🐉 Folding tip: Hold all the layers together while making this fold to prevent them from shifting.
Step 13
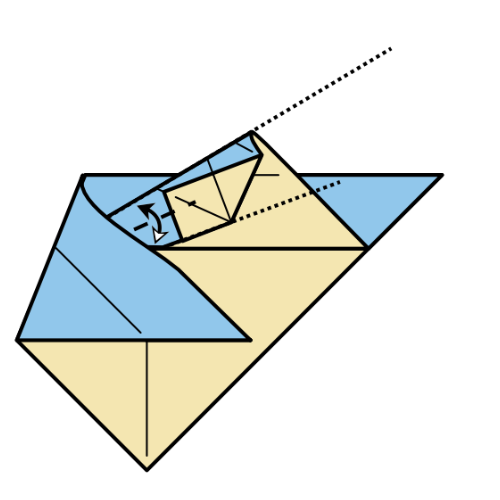
Fold along the angle bisector by bringing one edge up to the other. Then unfold. Only crease firmly where shown.
Step 14

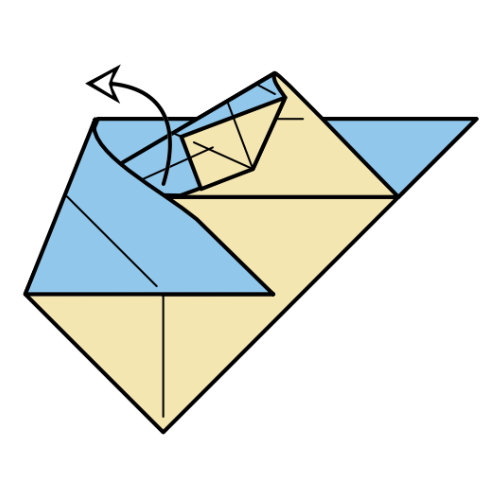
Unfold Step 12.
Step 15
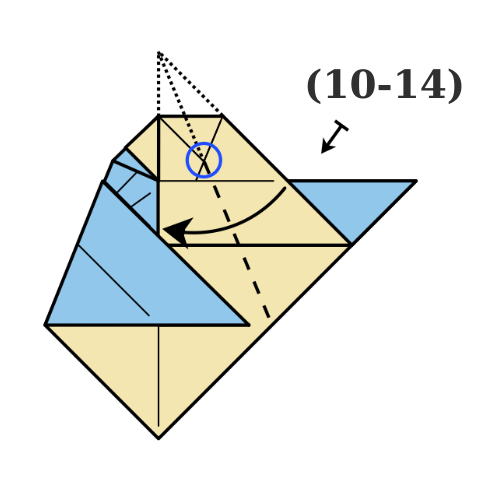
Repeat Steps 10 to 14 on the right side.
🐉 Folding tip: Unfold the left side to make these steps easier.
Step 16
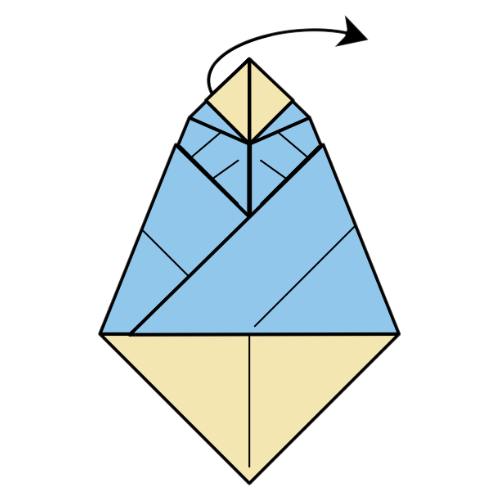
Slightly unfold the top section. Then wrap the square area from the back to the front, swinging it to the right.
Step 17
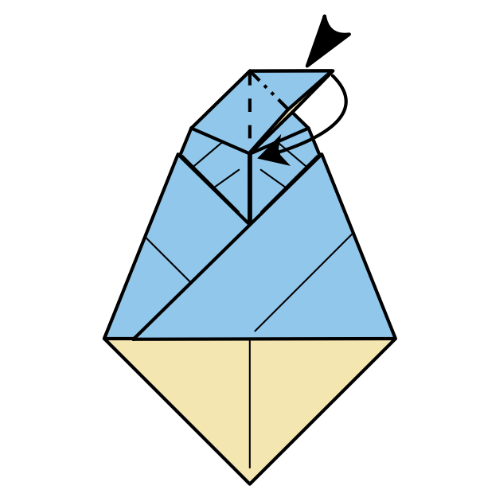
Squash-fold symmetrically.
Step 18
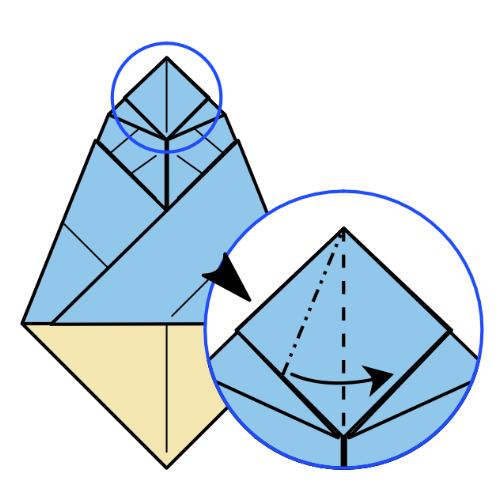
Squash-fold the left flap.
Step 19
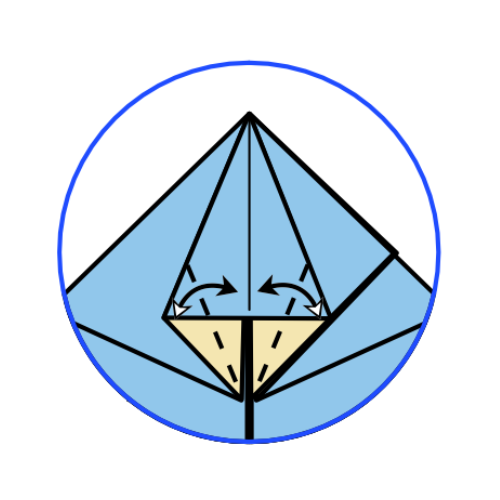
Fold the bottom left and right edges to the centerline. Then unfold.
🐉 Note: I’m using a larger sheet of paper from this step onward because it makes the details easier to see on camera. This model can be folded with 6 × 6 in paper, but I recommend starting with something larger, about 9.5 × 9.5 in, especially for your first attempt.
Step 20
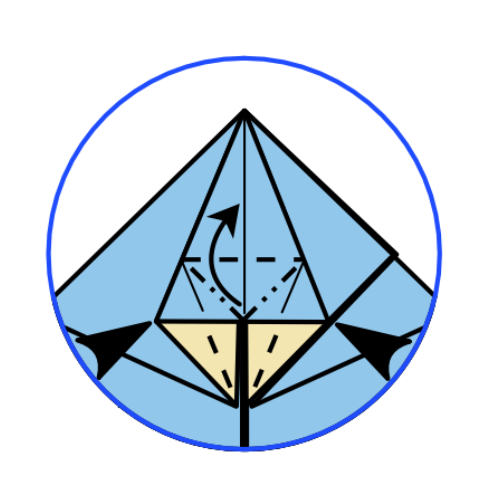
Petal-fold using the creases you just made.
Step 21
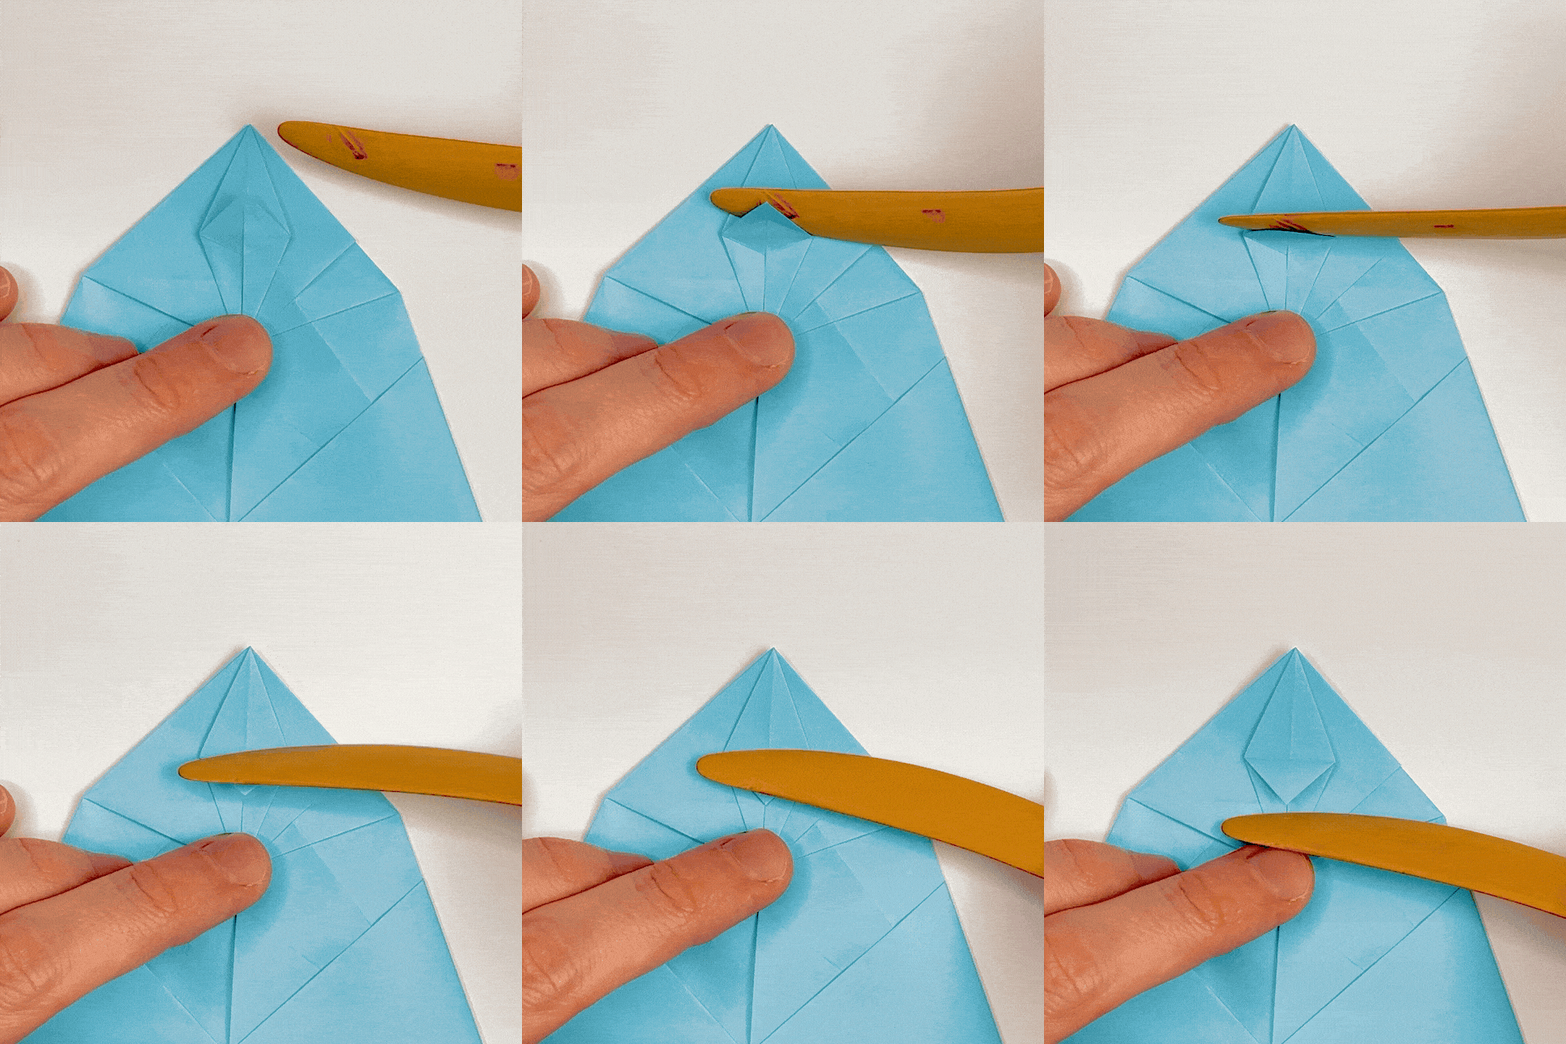
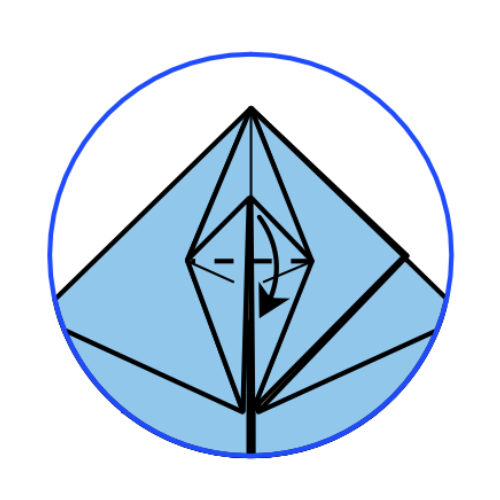
Fold the small corner down.
Step 22
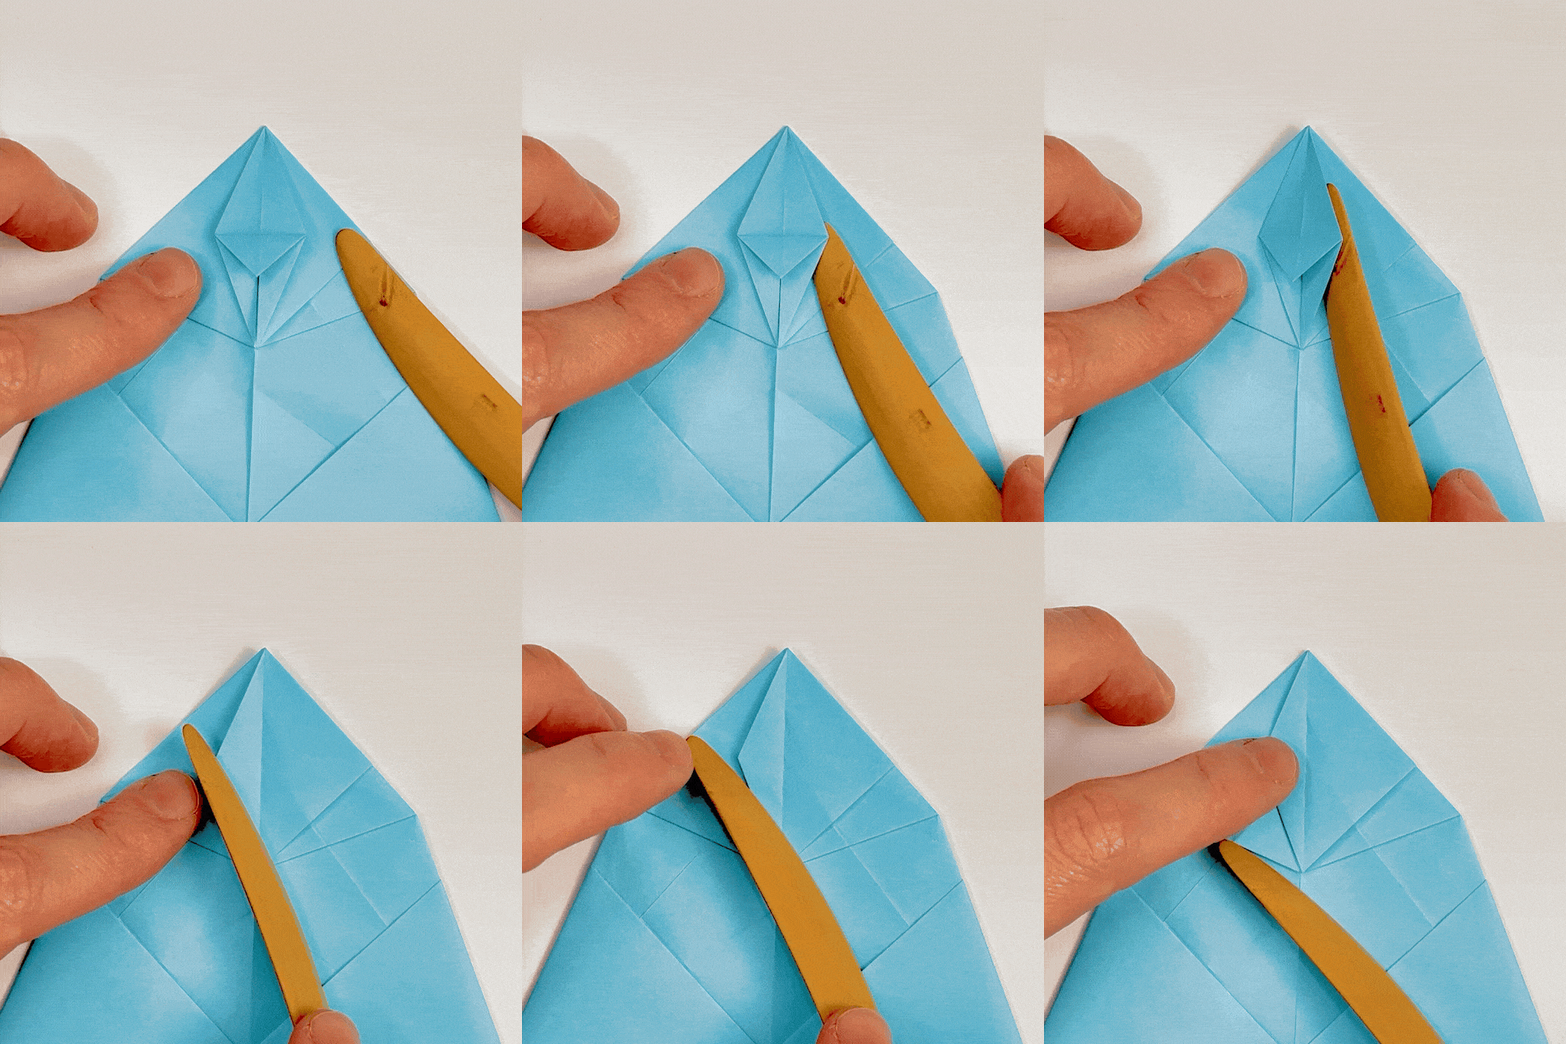
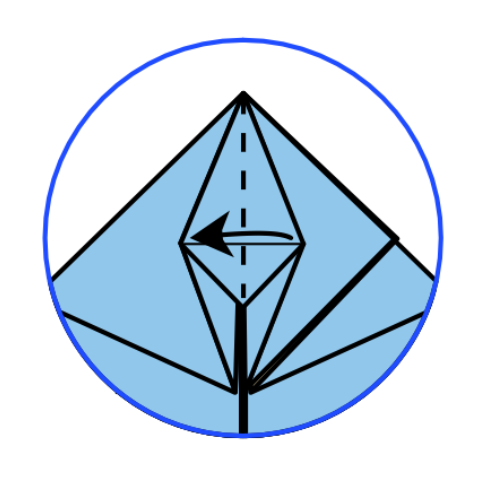
Fold the right flap to the left.
Step 23
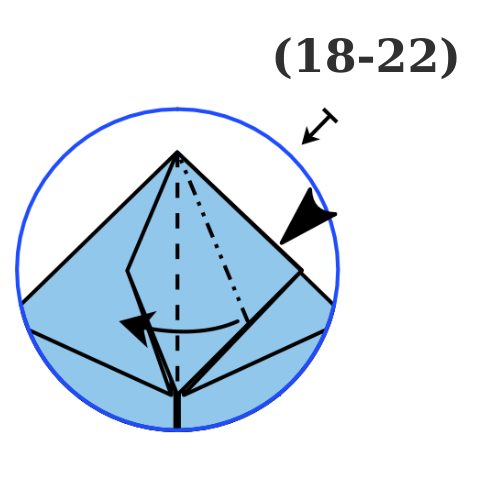
Repeat Steps 18 to 22, flipping left and right.
Step 24
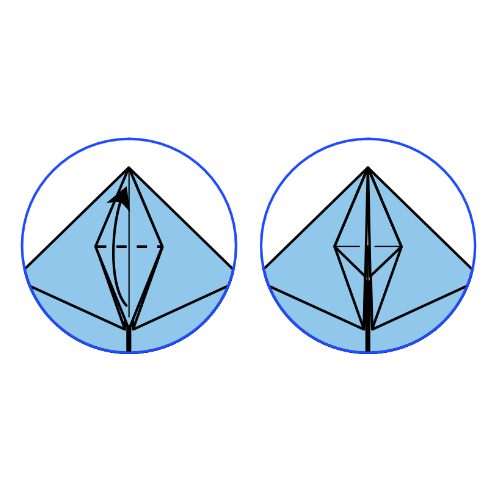
Fold the flap upward.
Step 25
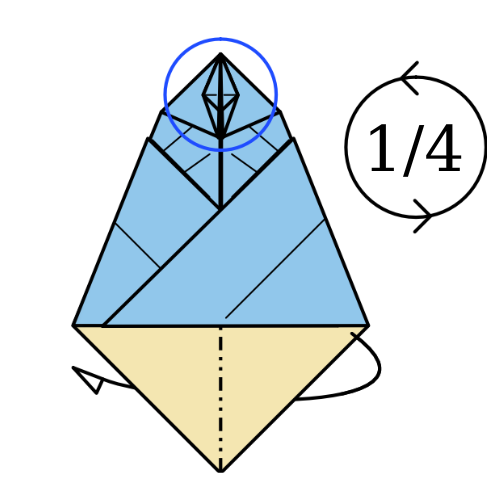
Mountain-fold the right half behind the left half, releasing the wings. Then rotate the model.
Step 26
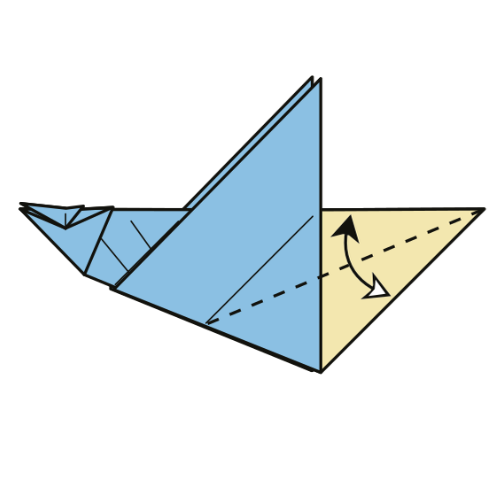
Fold the right edge to the top edge. Then unfold.
Step 27
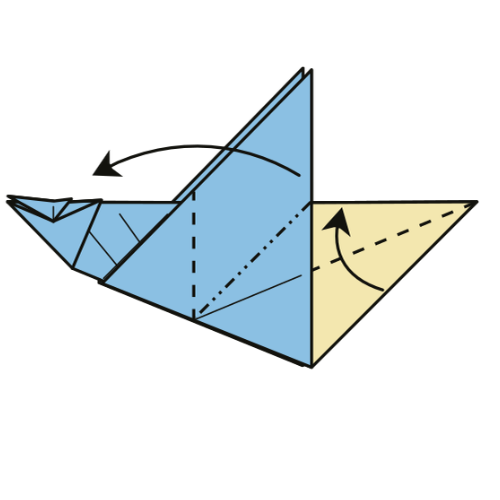
Swivel-fold to the left, using the crease from Step 26 as a guide.
Step 28
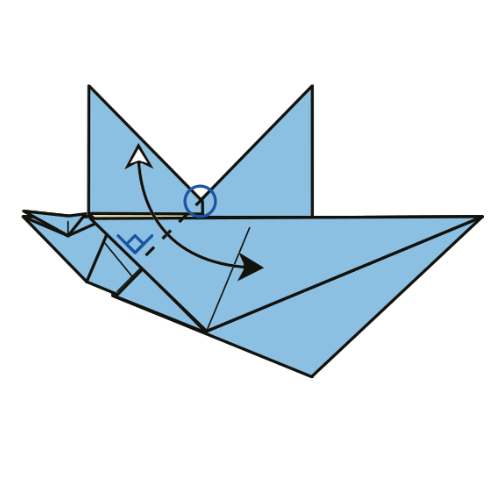
Fold the wing down, then unfold. Use a 90° angle.
Step 29
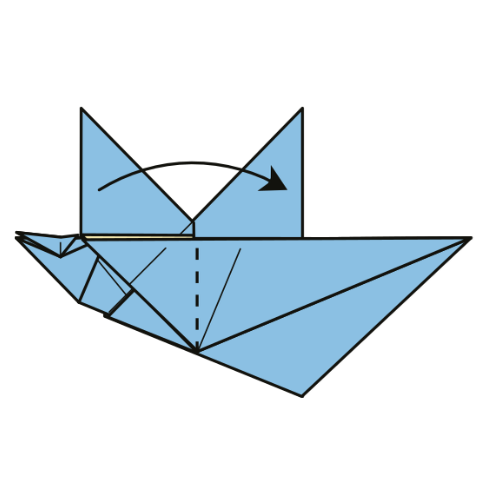
Fold the wing back to the right.
Step 30
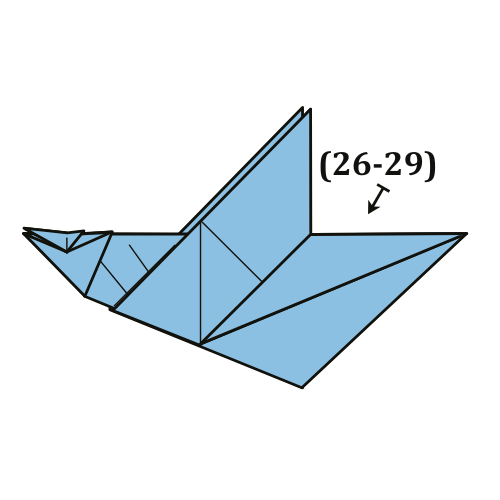
Repeat Steps 26 to 29 on the other side.
Step 31
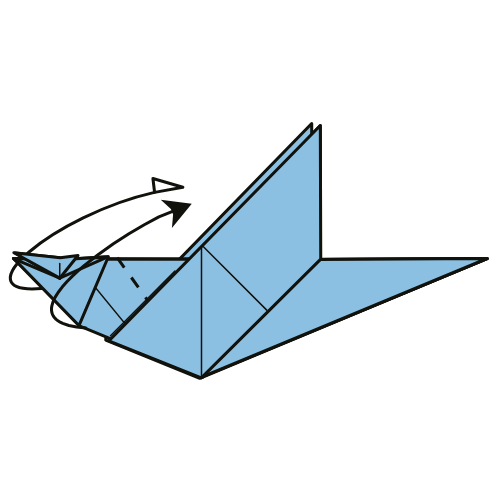
Outside-reverse-fold the head using the existing creases.
Step 32
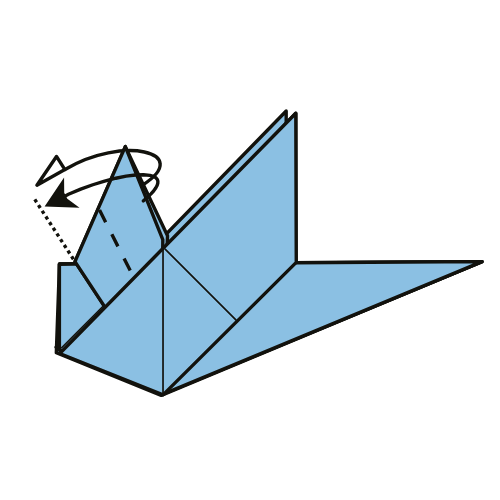
Again, outside-reverse-fold the head using the existing creases.
Step 33
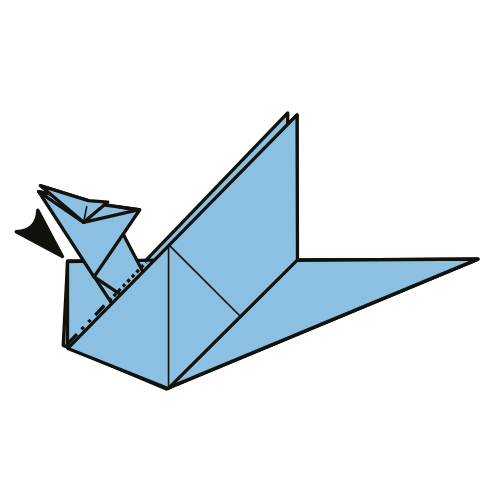
Reverse-fold the corner underneath the dragon’s head.
Step 34
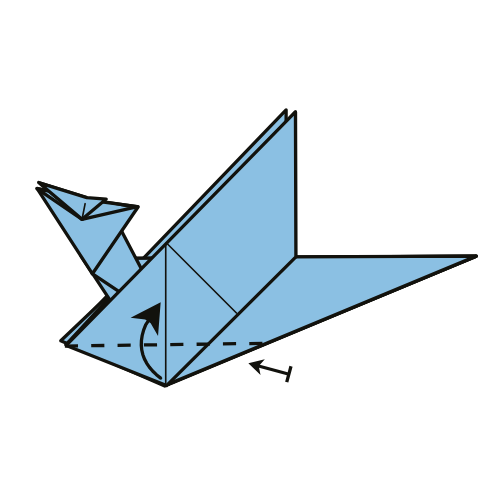
Fold the bottom corner up along a horizontal fold line. Repeat on the other side.
Step 35
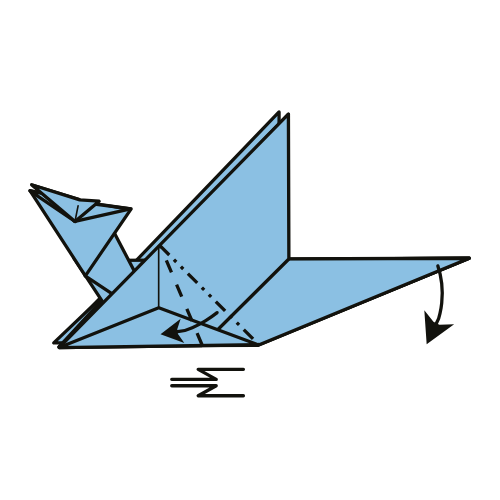
Crimp the section on the right downward, using the existing crease lines as guides.
🐉 Folding tip: You can do this in two stages. Fold one side at a time to pre-crease, then crimp-fold the entire section.
Step 36
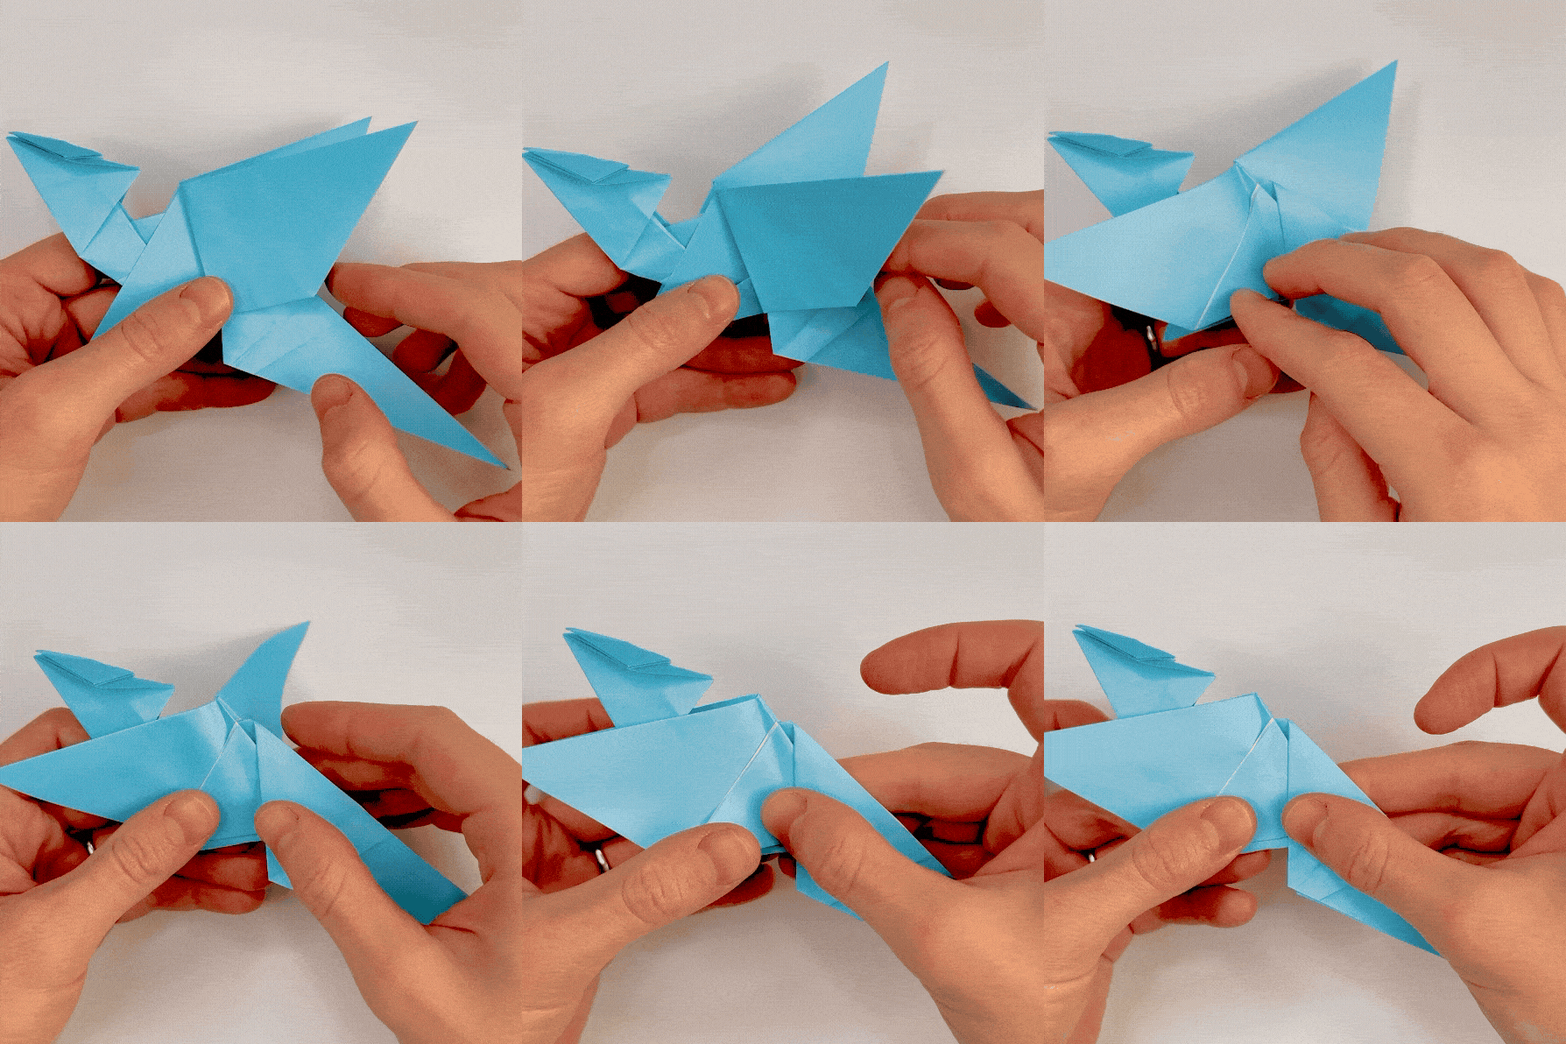
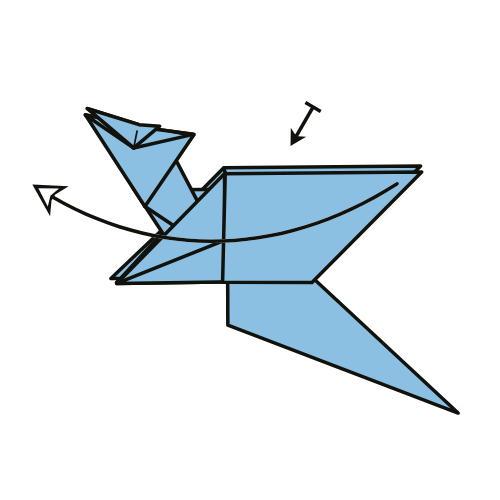
Unfold the wing to the left. Repeat on the other side.
Step 37
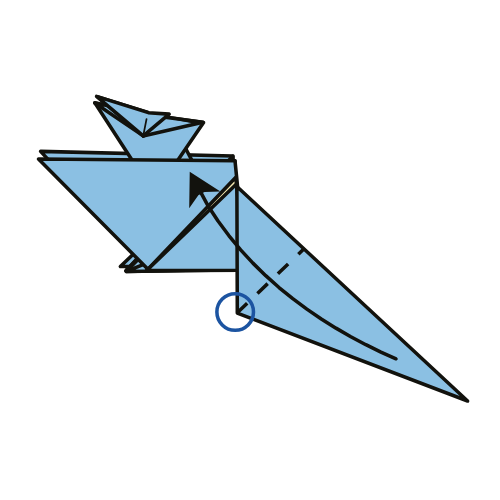
Fold the bottom corner up and to the left.
🐉 Note: You may notice a pre-crease here if you watch the video. I had to redo this step and the following ones because I accidentally skipped Step 36 during the initial fold.
Step 38
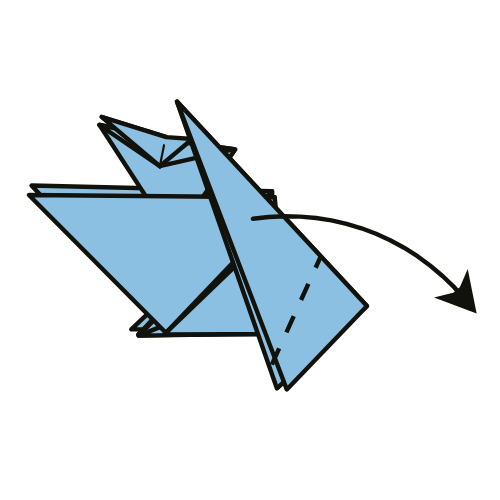
Fold the corner down and to the right.
Step 39

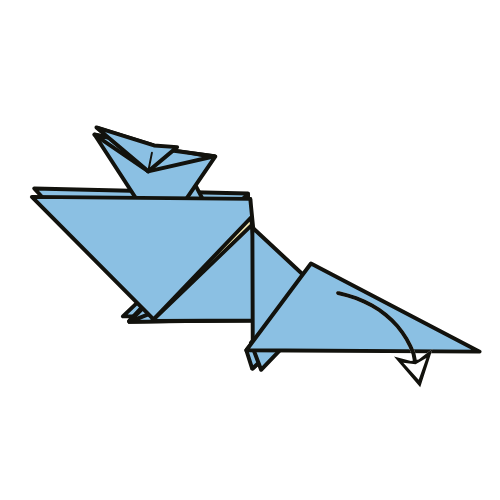
Unfold Steps 37 and 38.
Step 40
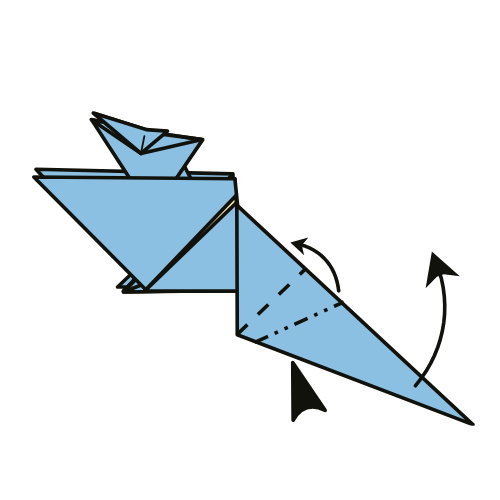
Outside-crimp using the creases from Steps 37 and 38.
🐉 Folding tip: You can do this step in two motions. First reverse-fold the tail upward, then reverse-fold it downward.
Step 41
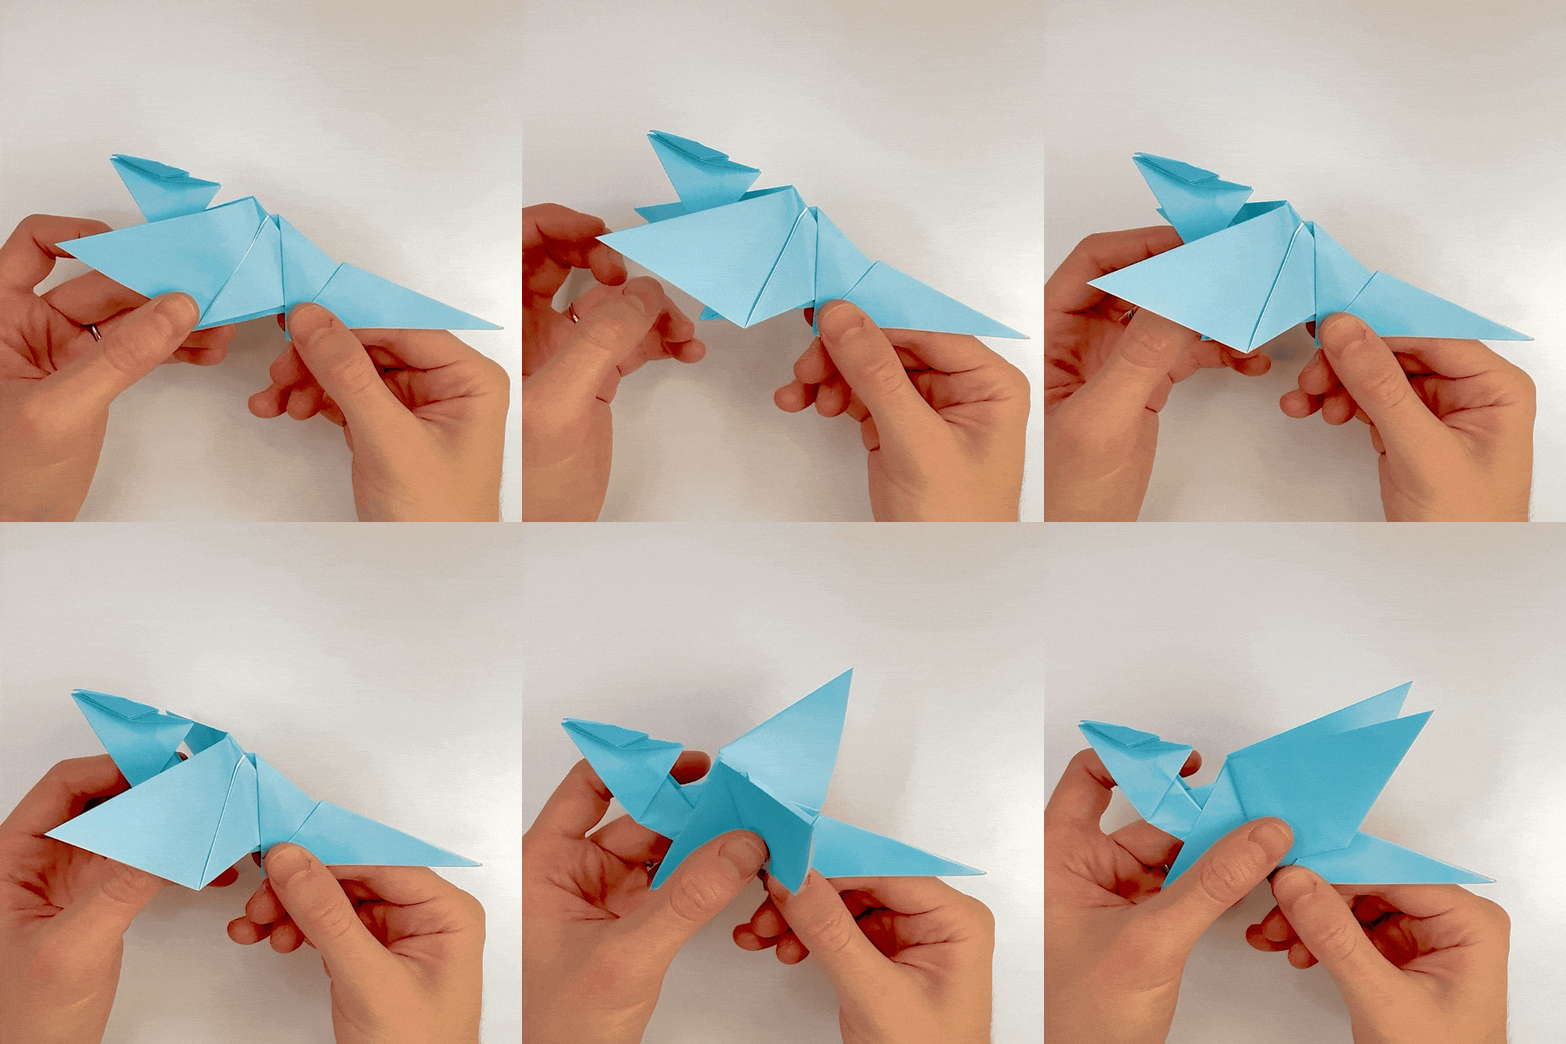
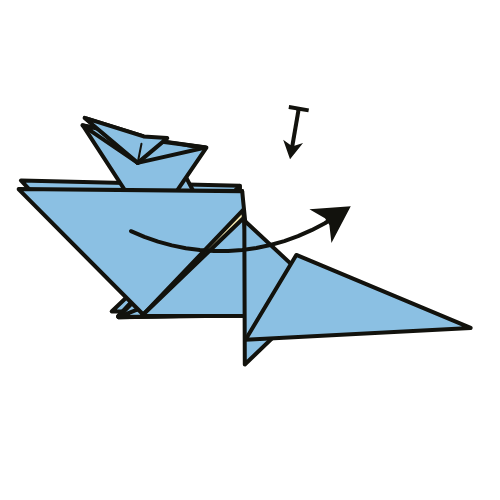
Fold the wing back to the right. Repeat on the other side.
Step 42
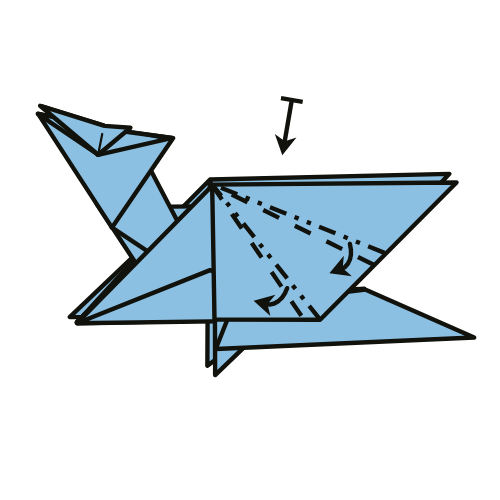
Pleat the wing. Then repeat on the other side.
🐉 Folding tip: Fold both wings at the same time, mirroring each fold, for a more symmetrical result.
Step 43
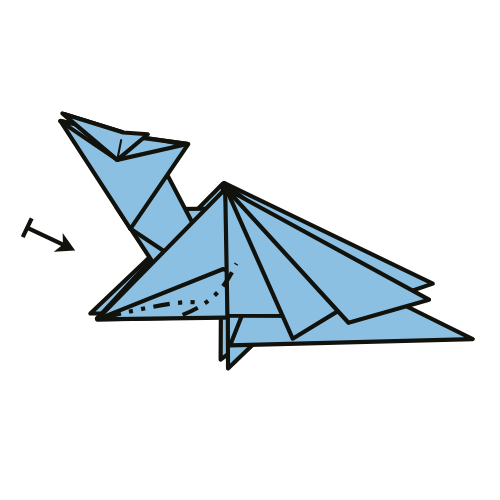
Pinch the foreleg. Then repeat on the other side.
Step 44
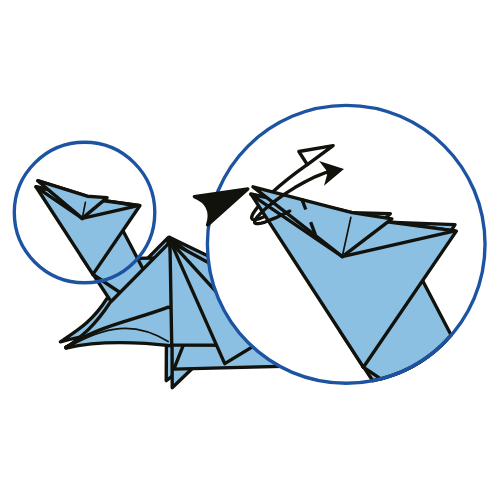
Outside-reverse-fold the upper corner of the top flap to form the dragon’s horn.
Step 45
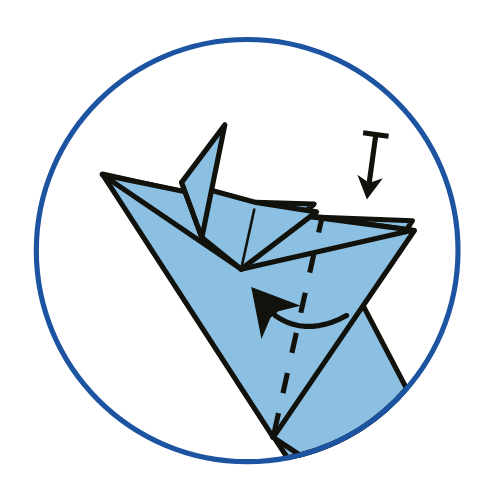
Fold the flap at the back of the head to the left. Then repeat on the other side.
Step 46

Fold the flap from Step 45 back to the right. Then repeat on the other side.
Step 47

Slightly fold the middle flap to the left. Then repeat on the other side.
Step 48
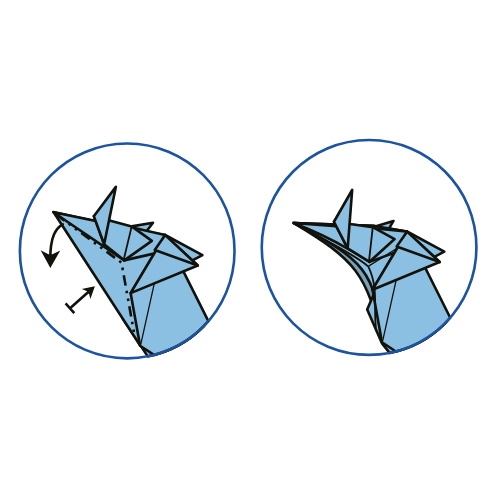
On each side of the head, pinch a mountain fold to narrow the snout.
Step 49
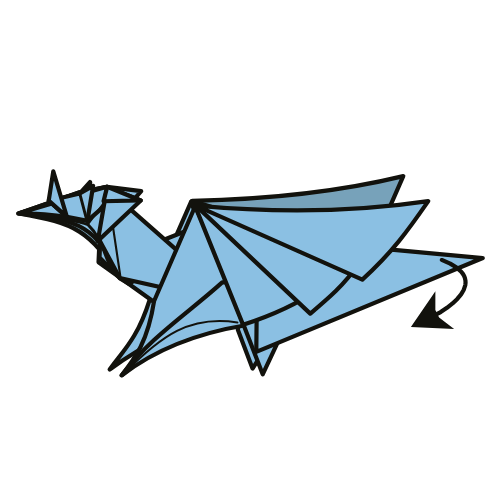
Spread the wings and curl the tail.
🐉 Folding tip: Feel free to shape the model further to give your dragon a more realistic look. Watch the video for a few examples and ideas.
🌏 Want to fold live with the designers? The 7th Origami World Marathon runs September 12 and 13: 48 new models, each taught over Zoom by its creator, with recordings if you miss a session. Register, 10% off for origami.me readers →
🎉 Completed! Your Origami Dragon Is Finished.
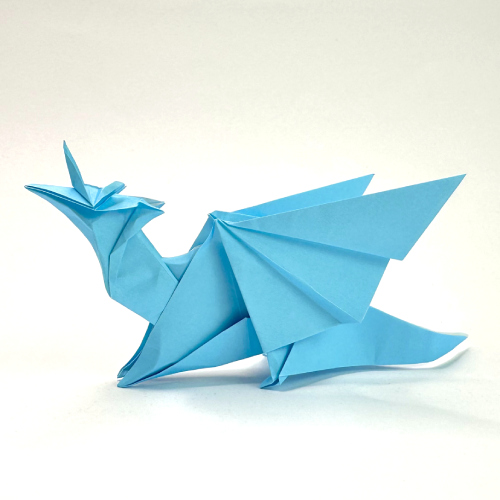
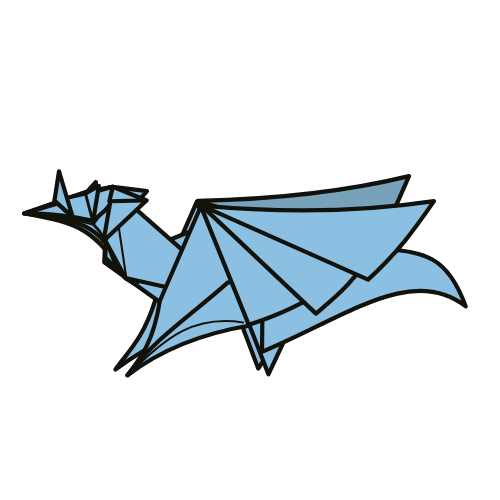
Take a moment to shape the wings, tail, and head until you’re happy with the final pose.
If your first dragon doesn’t look quite like the one in the photos, don’t worry. This is the kind of model that improves quickly with practice. Each attempt helps you better understand the shaping, wing angles, and proportions.
If you fold one, feel free to share a photo in the comments. I’d love to see the different papers, colors, and interpretations you come up with.
If you’d like to keep folding, you can have a look at our easy origami dragon, browse more origami animals, or challenge yourself with other intermediate origami models on the site.
You can also get new tutorials and folding ideas in our newsletter here. And if you prefer video instructions, you can follow along on YouTube.
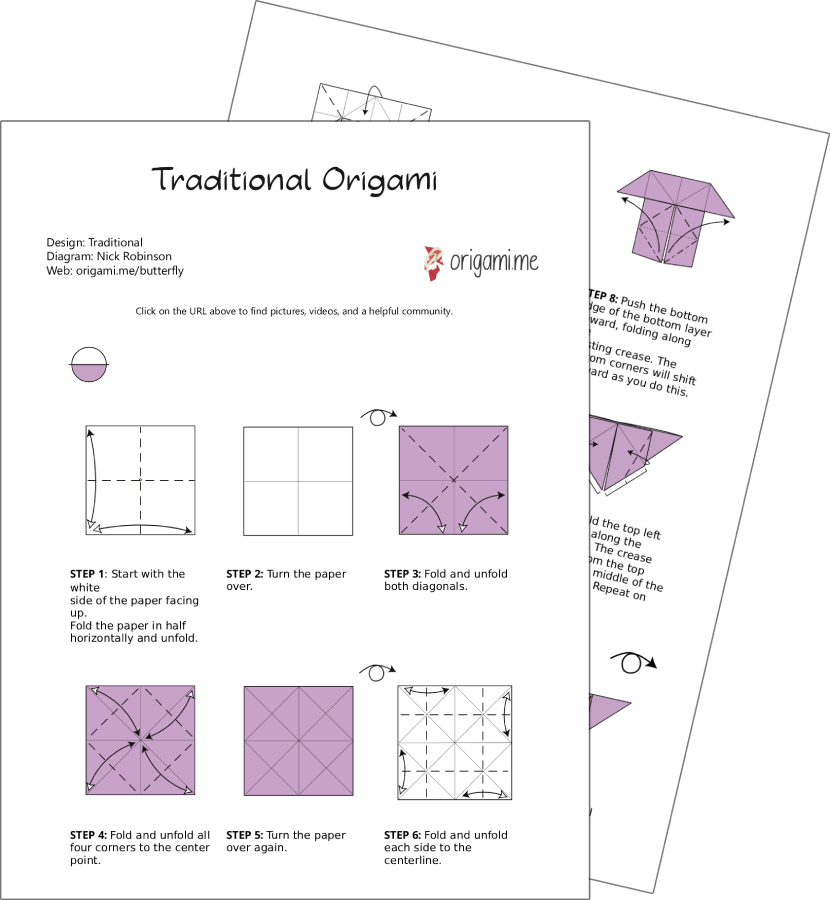
Download the Complete Origami Dragon v2 Printable PDF Instructions
This printable PDF is part of our Origami Friends membership on Patreon. As a member, you get access to these diagrams, our full library of 120+ printable PDFs, and member-only content.
🎓 Need printables licensed for classroom or group use? See the Origami Library for Educators →




This is so frustrating because for all the hard folds when I try to watch the video it say that “this video is private” like what the heck!!!!!
Hi Amberyn, Sorry about that! Those aren’t actually private, it’s a misleading error the video player shows when something on your end is blocking it from loading. Almost always it’s an ad blocker, a privacy browser (Brave, Firefox strict mode, DuckDuckGo), or a network/DNS filter cutting off WordPress.com. Quick things to try: open the page in a normal Chrome window with extensions off, or turn off your ad blocker / browser shields just for origami.me (incognito mode should work as well). If you’re on school or work WiFi, try mobile data instead. Let me know if that fixes it!
nice!