How to Make an Origami Vertigo

 Francesco Mancini
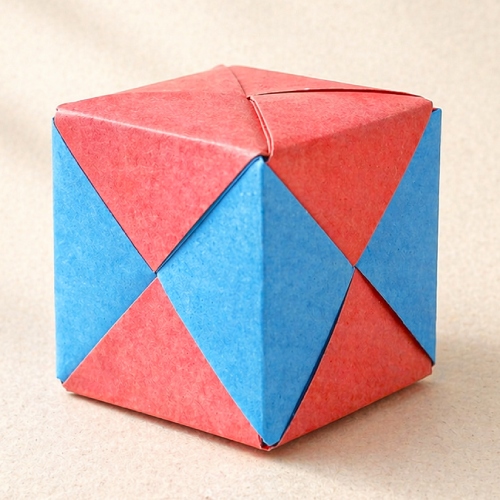
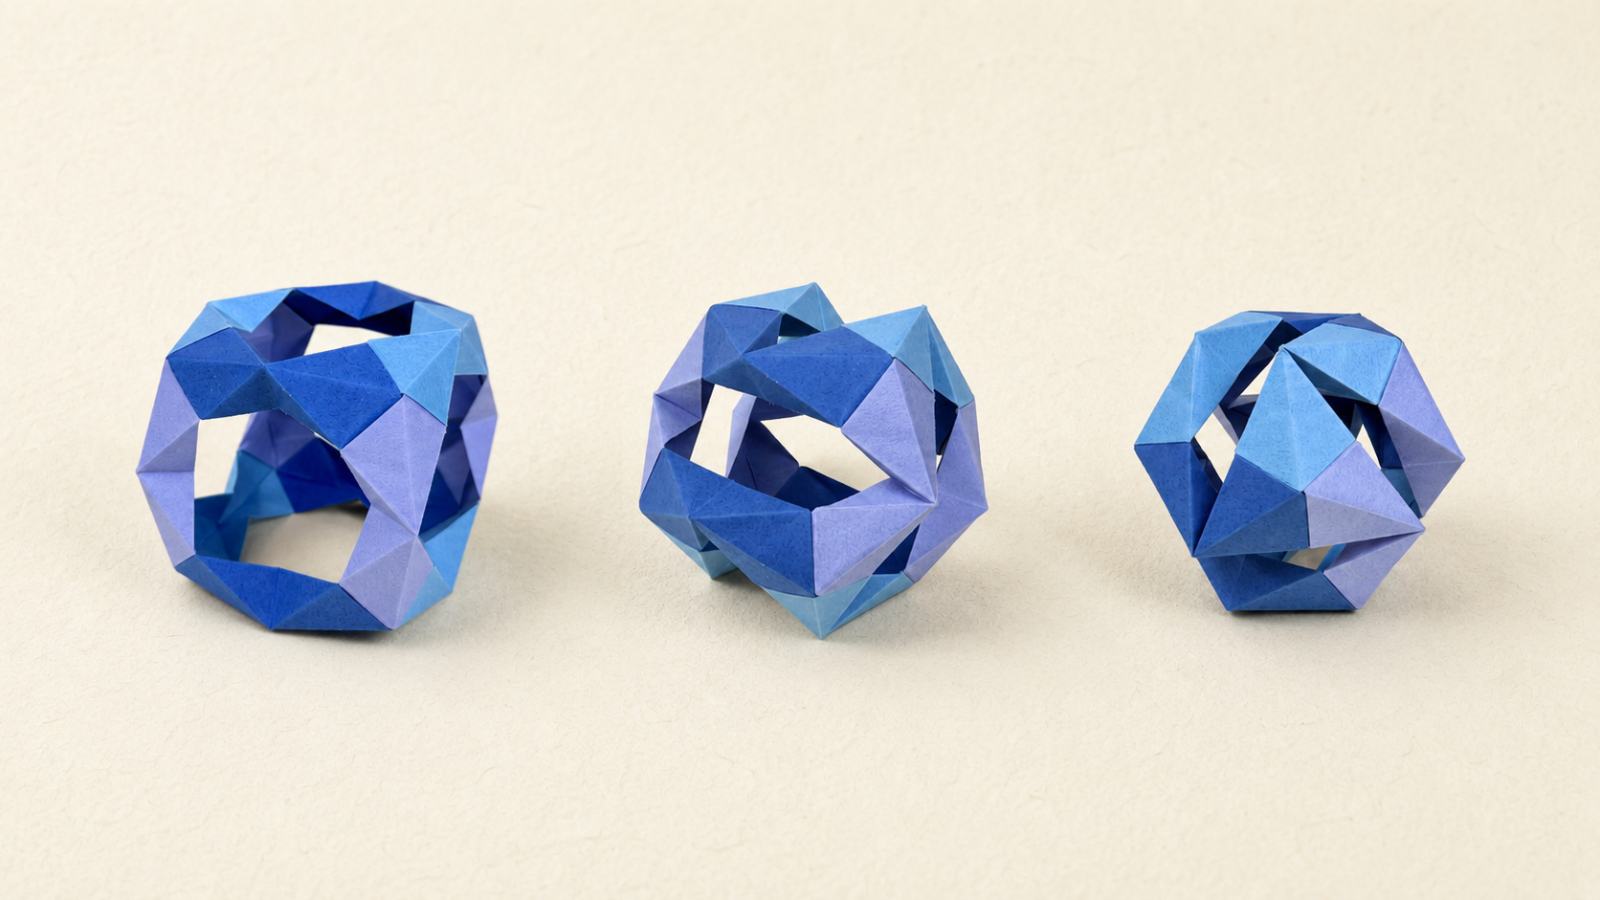
 Let’s fold the Vertigo, a twelve-unit modular cube designed by Francesco Mancini. Hold the finished model at two opposite corners, twist, and the whole cube compresses into a rhombic dodecahedron. Let go, and it opens back out.
This is the first action origami on the site. Action models are folded to move, and this one earns the name. It looks good sitting on a shelf, and it is very hard to leave it there.
There is no single difficult fold here, but there is a lot of precision. You will cut three squares down to 1:√2 rectangles, cut those into twelve smaller ones, fold twelve identical units, and then lock them together. Give yourself about an hour and a half and work through it one section at a time.
Take your time on the units. Twelve accurate units slot together easily, and twelve rough ones will fight you at the assembly stage.
Origami Vertigo Step-by-Step Instructions
- Difficulty: Easy – Beginner level 5
- Folding time: 1:30 to 1:45 hours
- Additional material: You will need scissors for the paper prep.
Recommended Paper
Three 6 x 6 in (15 x 15 cm) sheets of Tant origami paper or elephant hide, for a 2.5 x 2.5 in (6.5 x 6.5 cm) finished model.
If you can get it, Francesco Mancini recommends starting from twelve A7 sheets (2.9 x 4.1 in / 7.4 x 10.5 cm) of 90 gsm elephant hide, which skips the cutting altogether. This tutorial assumes you are starting from squares.
Preparing 3 Large 1:√2 Rectangles
Step 1
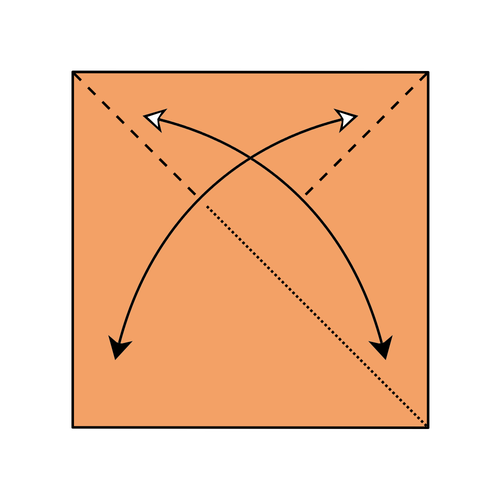
Fold and unfold along both diagonals, creasing firmly only near the top corners.
Step 2
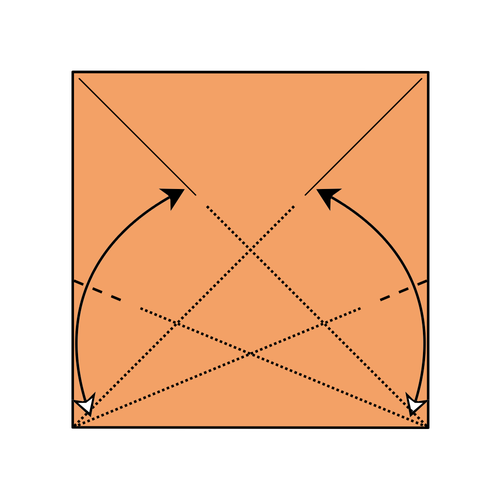
Fold the bottom edge up so it lies along the crease mark you just made, keeping the bottom left corner in place. Crease firmly only where the fold meets the right edge, then unfold. Repeat on the other side.
Step 3
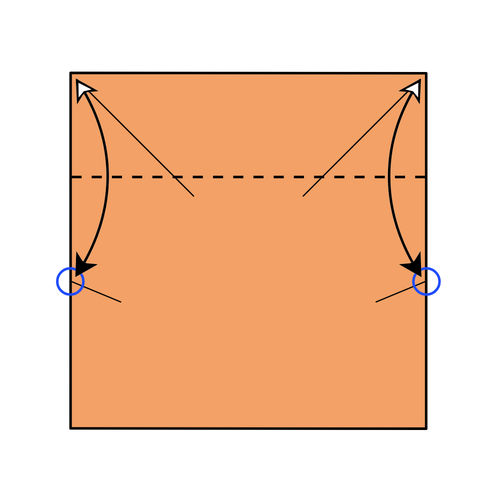
Fold the top edge down to the pinch marks you just made, then unfold.
Step 4
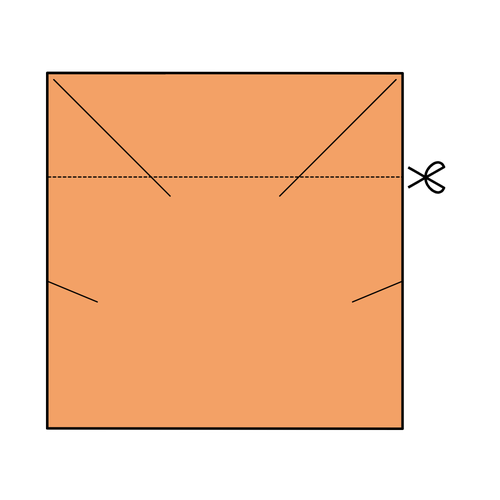
Cut along the crease you just made. The larger piece is your rectangle, with sides in a 1 to √2 ratio. Set the narrow top strip aside.
🌀 Folding tip: You can use this rectangle as a template to cut the other two sheets, so you don’t have to repeat Steps 1 to 3. In the video, I show you how I use the rectangle as a template before cutting.
Step 5
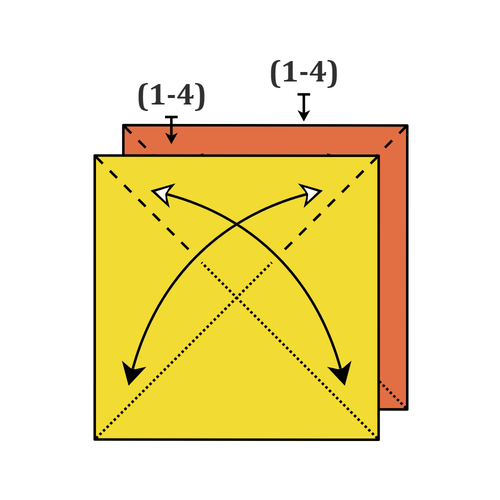
Repeat Steps 1 to 4 with two more squares, so you end up with three large rectangles.
Your 3 Large Rectangles Are Complete
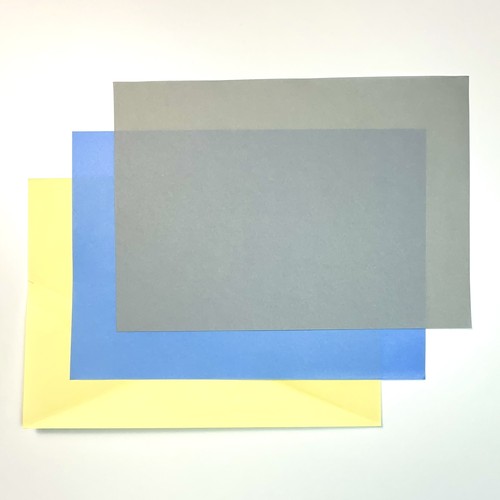
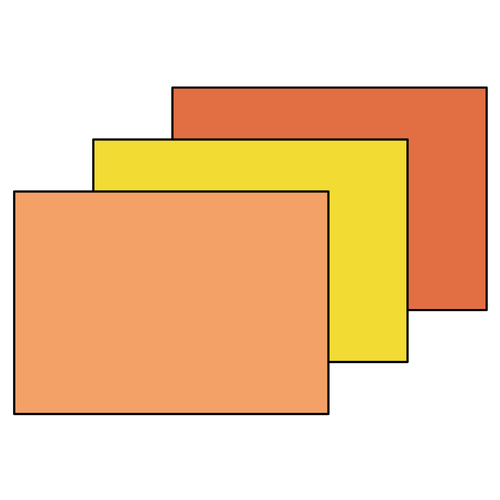
Preparing 12 Small 1:√2 Rectangles
Start with one large rectangle, colored side up.
Step 1
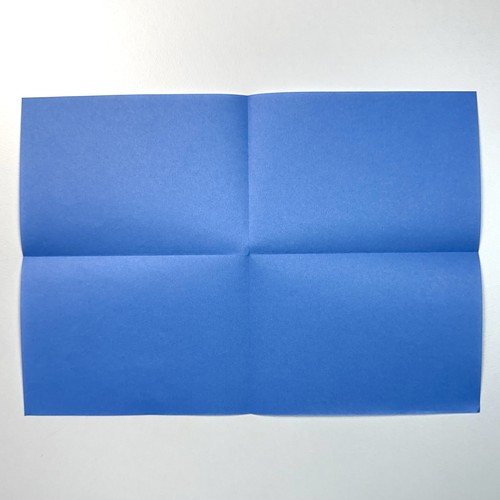
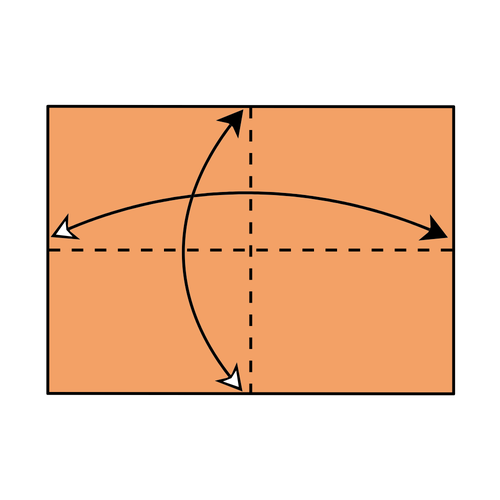
Fold the paper in half in both directions, then unfold.
Step 2
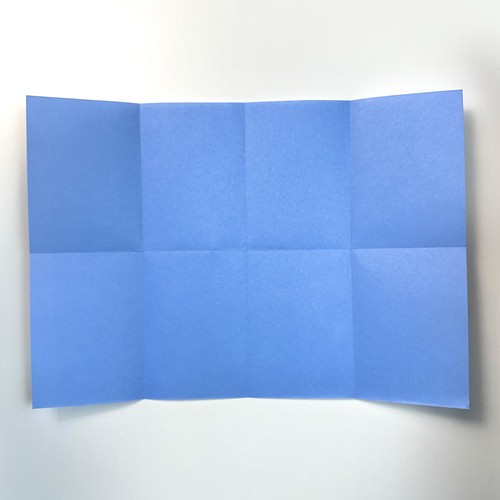
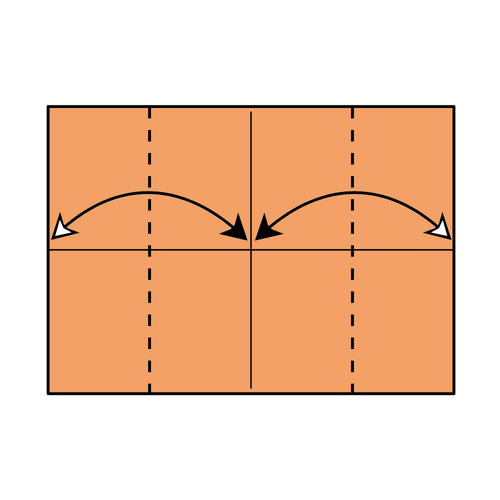
Fold the left and right edges to the vertical center crease, then unfold.
Step 3
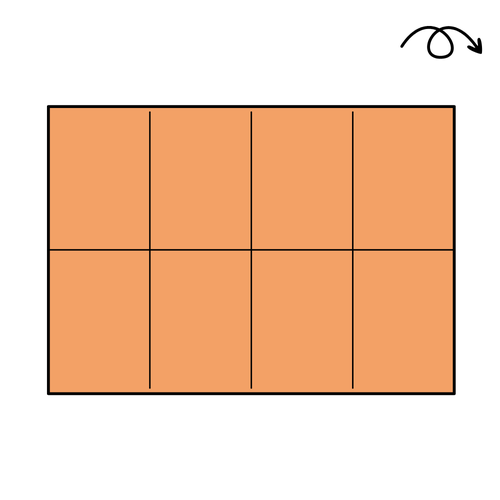
Turn the paper over.
Step 4
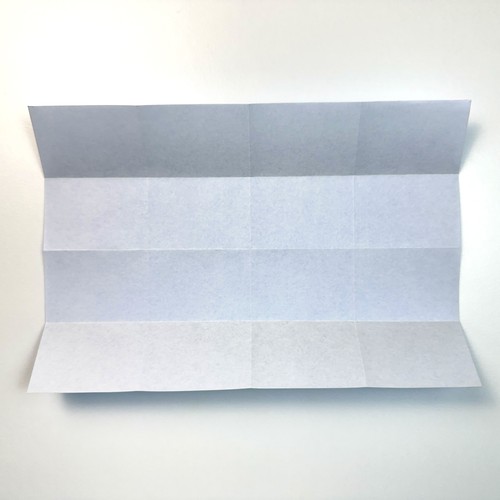
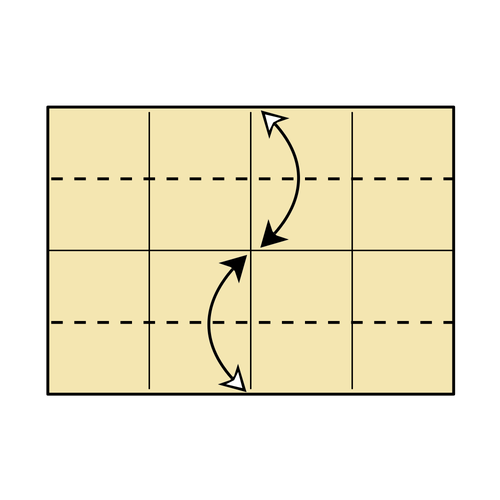
Fold the top and bottom edges to the horizontal center crease, then unfold.
Step 5
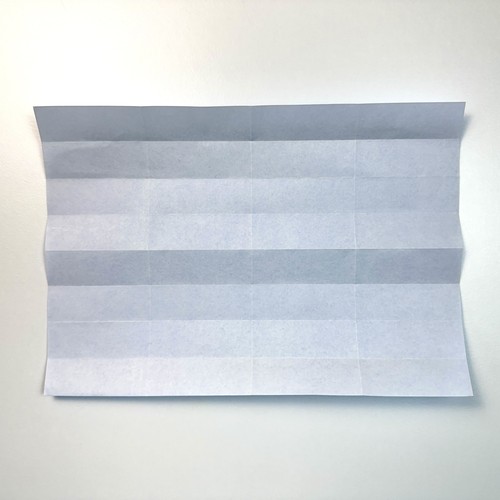
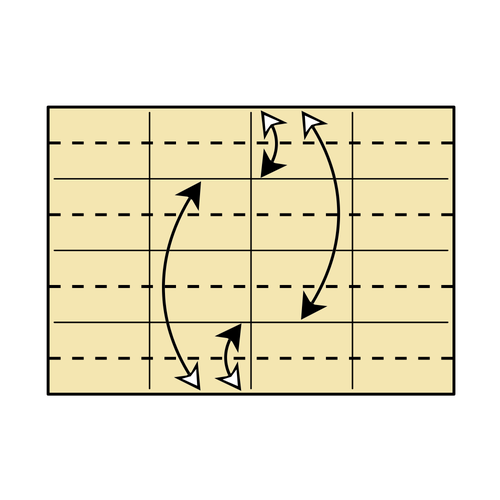
Add four more horizontal creases, each one halfway between two existing lines, so the paper is divided into eighths from top to bottom.
Step 6
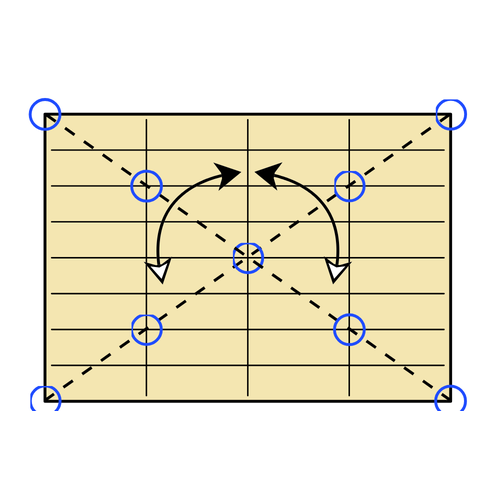
Fold and unfold along both diagonals, corner to corner. Each crease should pass through the circled points where the grid lines cross.
🌀 Folding tip: Fold from the center point toward the corners, making sure each fold passes through the circled points.
Step 7
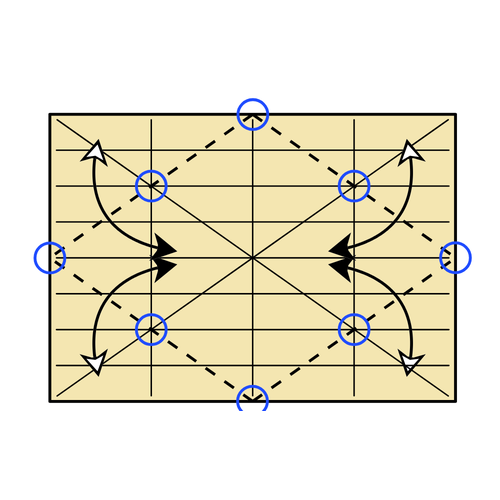
Fold and unfold four more creases, each running from the middle of one edge to the middle of the next, so together they form a diamond.
🌀 Folding tip: Again, fold from the center point toward the edges. You can keep one corner folded while folding the next corner to help guide your fold line. Take your time.
Step 8
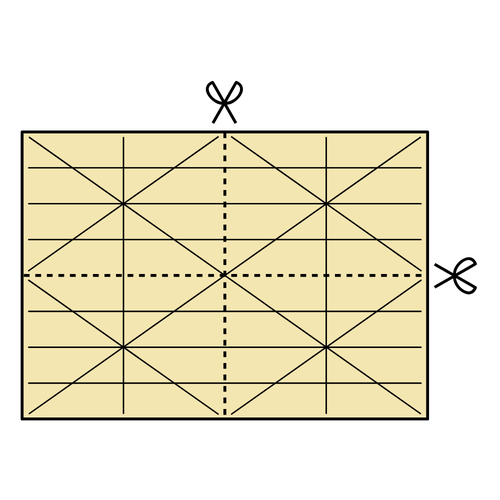
Cut along the horizontal and vertical center creases to make four small rectangles.
Step 9
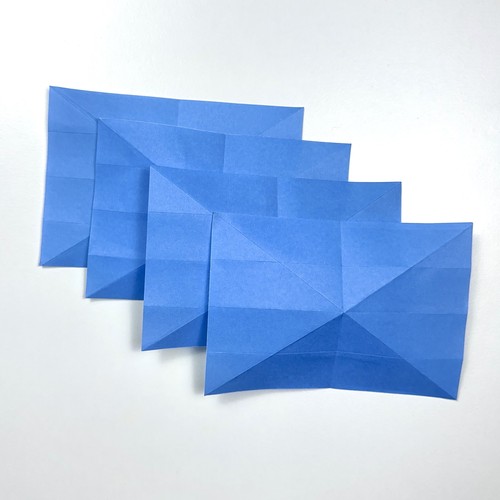
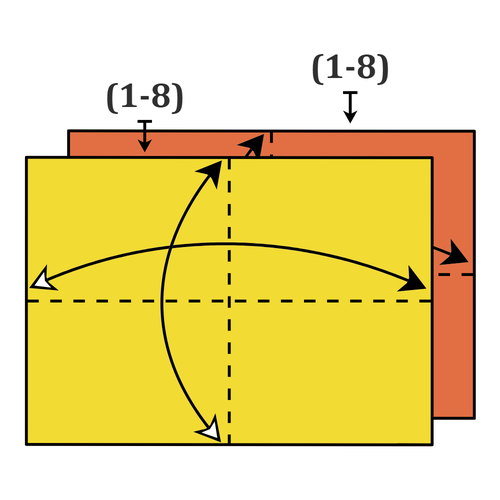
Repeat Steps 1 to 8 on the other two large rectangles, so you end up with twelve small rectangles.
Your 12 Small Rectangles Are Complete
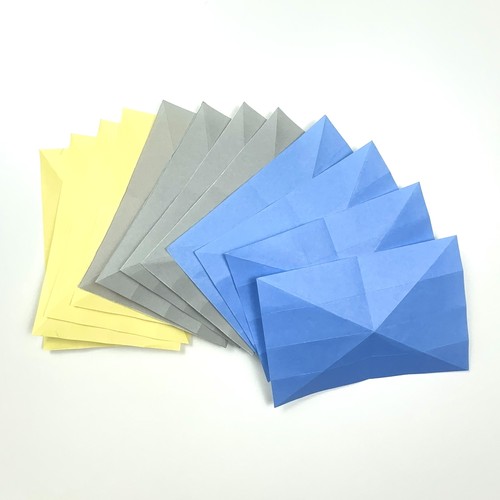
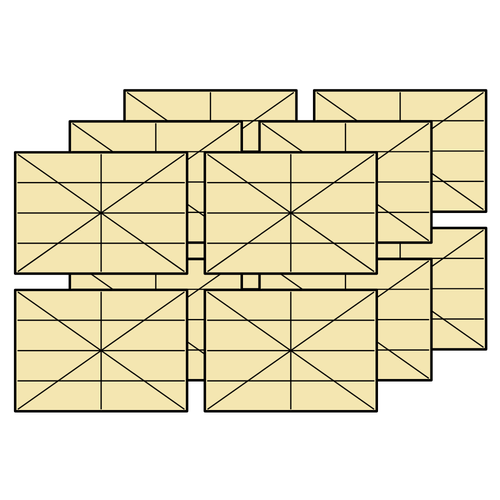
Preparing One Unit
Start with one small rectangle, white side up.
Step 1
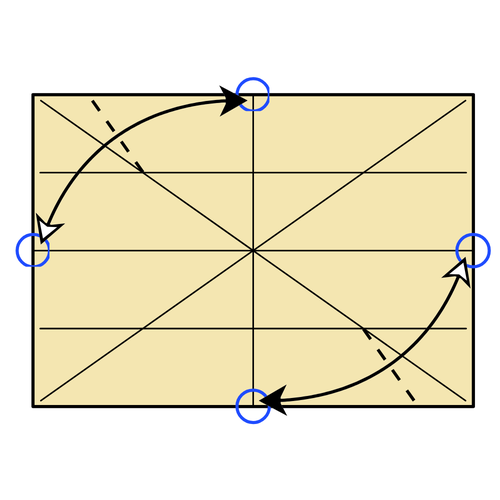
Fold the circled point on the left edge up to the circled point on the top edge, creasing firmly only where shown, then unfold. Repeat with the circled points on the right.
Step 2
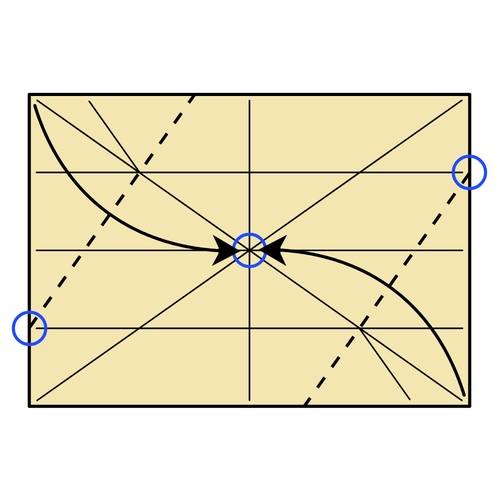
Fold the bottom right corner toward the center point, using the circled point on the right edge as a guide. Repeat with the top left corner.
🌀 Folding tip: Focus on matching the circled points at the edges as you fold.
Step 3
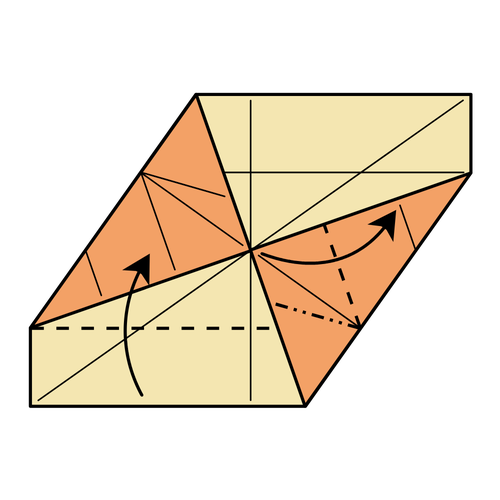
Swivel fold the lower left half upward along the existing creases.
Step 4
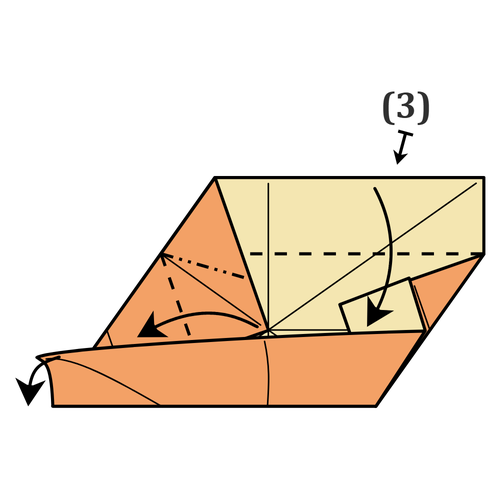
Slightly lift the left end of the bottom strip’s top edge, then repeat Step 3 on the upper half.
Step 5
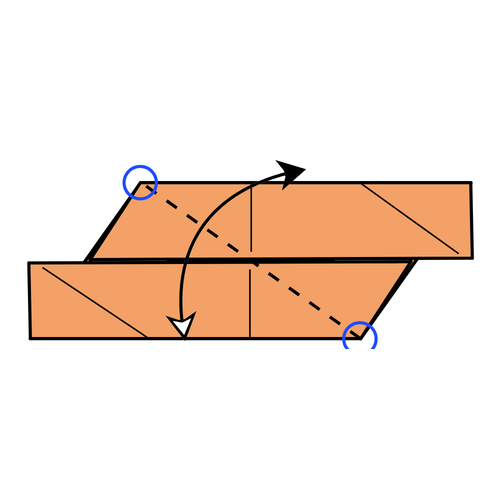
Fold and unfold along the line joining the two circled points. This crease already exists on the layer underneath, so you are only transferring it to the near layers.
🌀 Folding tip: From Steps 5 to 9, hold the layers firmly in place as you fold along the existing creases. This will help keep the layers from shifting.
Step 6
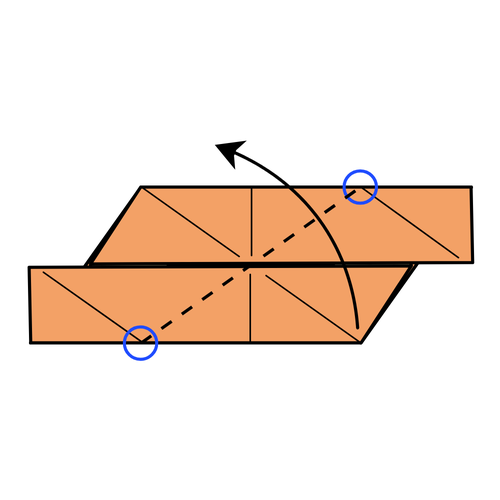
Fold along the line joining the two circled points, this time leaving it folded. Again, the crease already exists on the layer underneath.
Step 7
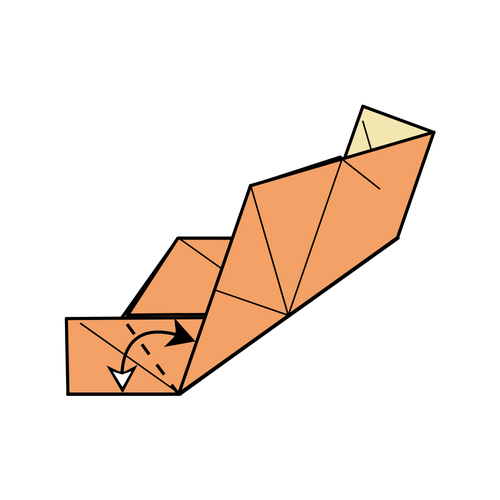
At the lower left end, fold the bottom edge of the end flap up so it lines up with the long slanted edge that meets it at the corner, then unfold.
Step 8
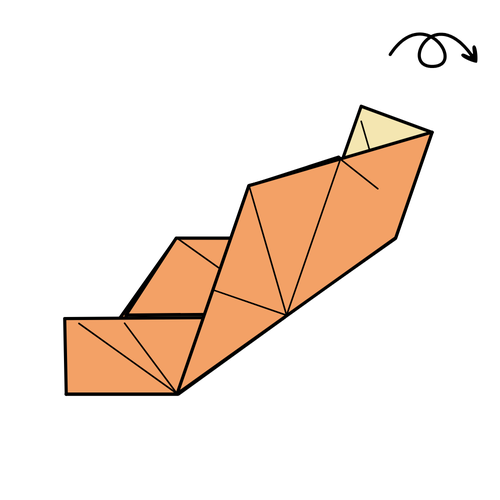
Turn the unit over.
Step 9
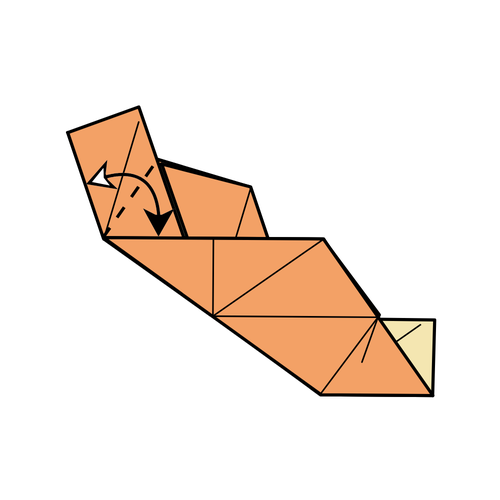
Make the same fold as in Step 7 at the end flap now at the top left.
Step 10
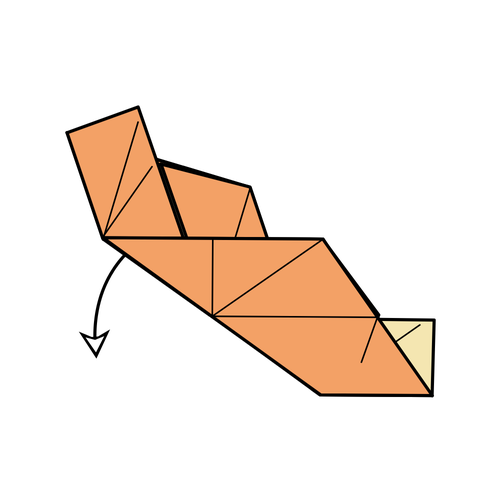
Unfold Step 6.
Step 11
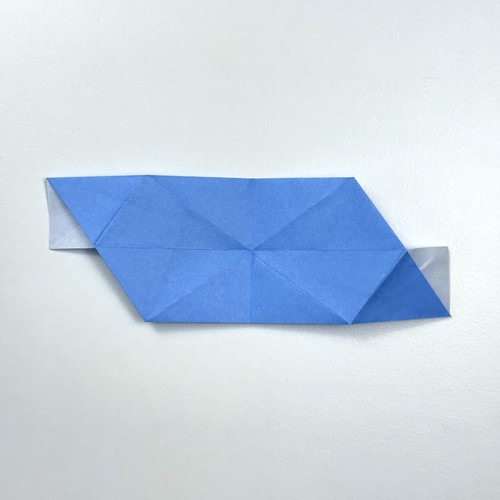
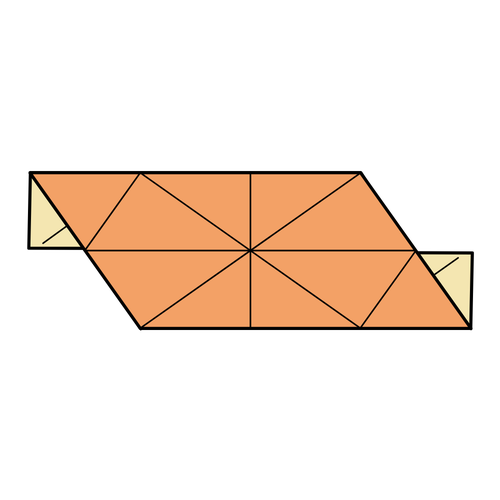
Repeat Steps 1 to 10 on the other eleven small rectangles.
Your 12 Units Are Complete
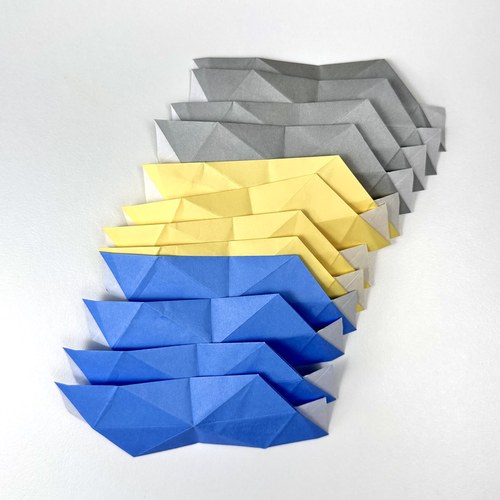
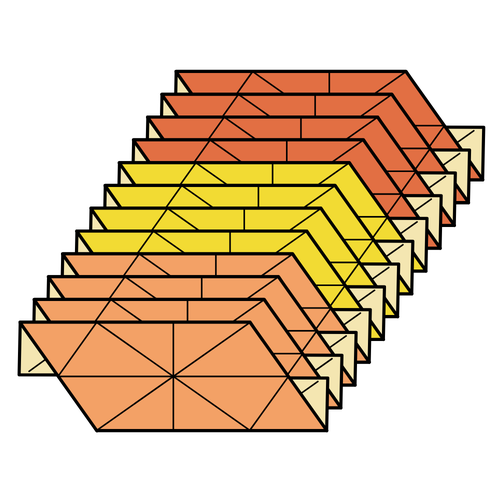
Assembly
Take three units of different colors.
Step 1
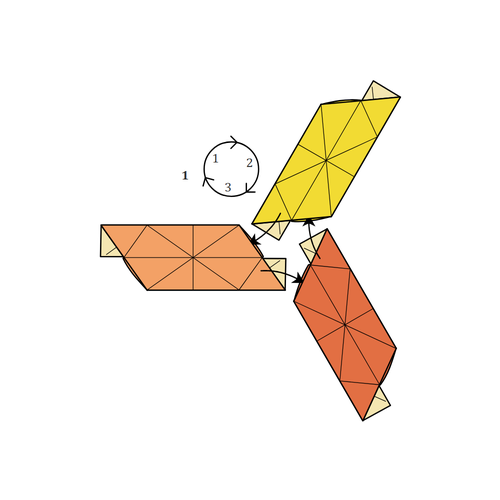
Slot the flap of each unit into the pocket of the next, working around in a ring so the three colors run clockwise. The units will not lie flat yet.
🌀 Folding tip: Keep the units mostly flat while inserting the flaps into the pockets. Once they’re connected, gently fold at the joints while pushing the units toward the center, until the three edges meet. Don’t force the folds.
Step 2
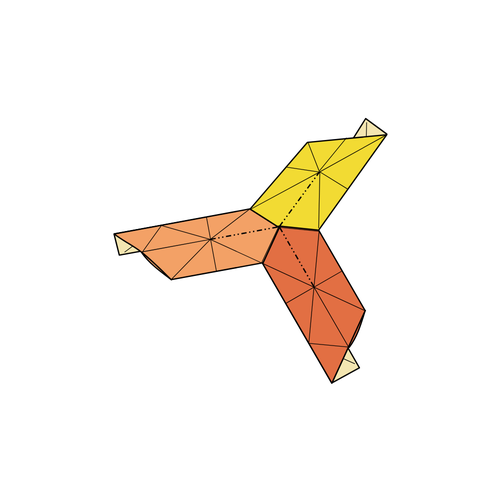
Lock each unit in place with gentle mountain folds. Don’t press firmly; the angles should be narrow. The big triangle edges should be straight.
Step 3
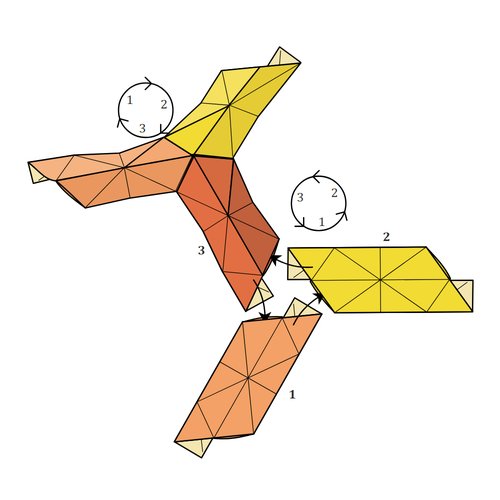
Add more units the same way, using Steps 1 and 2. Around this new point, the colors run the other way, counterclockwise.
Step 4
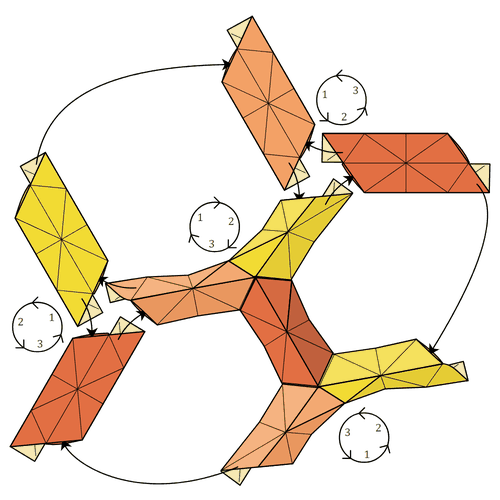
Keep going. Every point is a triple of three colors, and neighboring points always run in opposite directions, one clockwise and the next counterclockwise. Continue until all twelve units are joined and the model has closed into a cube shape.
Step 5
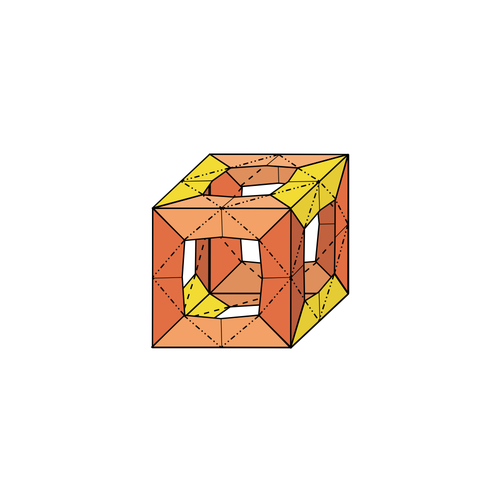
Gently pinch along the existing mountain folds to reinforce them.
Your Origami Vertigo Is Complete
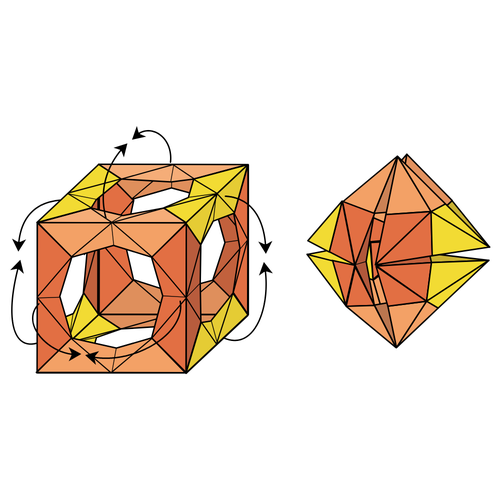
🌀 How to use it: Hold the model at two opposite corners and twist in either direction, so it compresses into a rhombic dodecahedron.
In the video, you can see a large model folded from 9.5 x 9.5 in (24 × 24 cm) kami and a smaller one folded from 6 x 6 in (15 × 15 cm) Tant origami paper.
I used kami for the tutorial because the folds are easier to see, but I recommend using a slightly thicker paper for the finished model. It gives the Vertigo a sturdier feel and makes it more satisfying to manipulate.
I hope you enjoyed folding the Vertigo. It asks for more patience than most models on the site, and the first time it compresses in your hands makes up for all twelve units.
Three contrasting colors show off the structure best, because every point is a triple of three colors and neighboring points always spiral in opposite directions, one clockwise and the next counterclockwise. A single color works just as well if you would rather let the shape do the talking.
If you fold one, share a photo in the comments. I would love to see which colors you picked.
Want to keep folding? Browse more easy origami tutorials or our collection of modular origami.
You can also get new tutorials and folding ideas in our newsletter, and if you like folding along with video, subscribe to our origami YouTube channel.
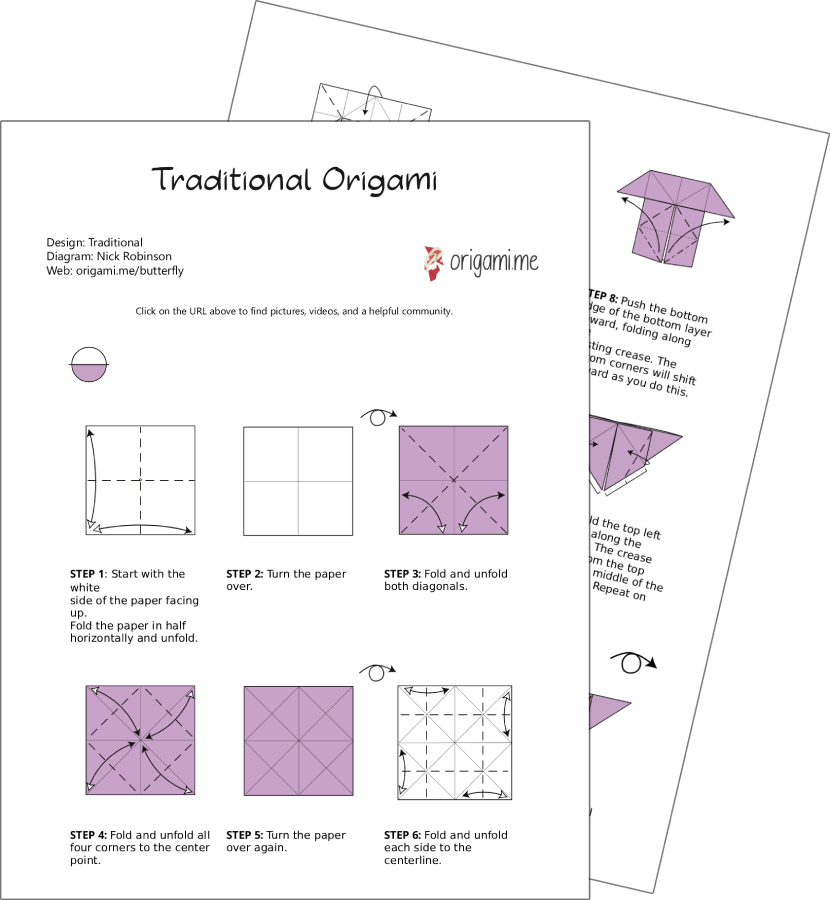
Download the Complete Origami Vertigo Printable PDF Instructions
This printable PDF is part of our Origami Friends membership on Patreon. As a member, you get access to these diagrams, our full library of 120+ printable PDFs, and member-only content.
🎓 Need printables licensed for classroom or group use? See the Origami Library for Educators →